
Content
Hello, Hola, Ciao, Bonjour, Hallo. Well well let’s just say I was getting bored of using the same introduction in my blogs so I wanted to switch up a little :). In this blog we are going to utilize some of the AI/ML services in AWS. We are going to build a serveless website that uses image recognition and a chatbot system. AWS has services that can be used to create these with ease instead of taking time to train these ML models from scratch…Amazing right? I’m going to assume you know how to host static websites on S3. If you don’t know how to do that, I have a blog on it and you can check it out. To do this project, you are not expected to have any background knowledge in the AI/ML services. Having a general understanding of Javascript will be perfect for the project. Now let’s focus on the AI/ML services. AWS has services that support the developments of chatbot and image recognition systems. These services are Amazon Lex and Amazon Rekognition
Amazon Lex is a fully managed artificial intelligence (AI) service with advanced natural language models to design, build, test, and deploy conversational interfaces in applications.
It has the following use cases:
- Build virtual agents and voice assistants: Enable self-service capabilities with virtual contact center agents and interactive voice response (IVR). Users can change a password or schedule an appointment without speaking to a human agent.
- Automate informational responses: Design conversational solutions that provide responses to frequently asked questions. Improve Connect & Lex conversation flows for tech support, HR benefits, or finance with natural language search for FAQs powered by Amazon Kendra.
- Improve productivity with application bots: Automate basic user tasks in your application with powerful chatbots. Seamlessly connect with other enterprise software through AWS Lambda and maintain granular access control through IAM.
- Maximize the information trapped in transcripts: Design chatbots using existing contact center transcripts. Reduce design time from weeks to hours and accelerate bot deployment.
Amazon Rekognition is a service that makes it easy to add powerful visual analysis to your applications. Amazon Rekognition is based on the same proven, highly scalable, deep learning technology developed by Amazon’s computer vision scientists to analyze billions of images and videos daily. It requires no machine learning expertise to use. It also includes a simple, easy-to-use API that can quickly analyze any image or video file that’s stored in Amazon S3. Amazon Rekognition is always learning from new data, and we’re continually adding new labels and facial comparison features to the service. Common use cases for using Amazon Rekognition include the following:
- Searchable image and video libraries: It makes images and stored videos searchable so you can discover objects and scenes that appear within them.
- Face-based user verification: It enables your applications to confirm user identities by comparing their live image with a reference image.
- Detection of Personal Protective Equipment: It detects Personal Protective Equipment (PPE) such as face covers, head covers, and hand covers on persons in images. You can use PPE detection where safety is the highest priority. For example, industries such as construction, manufacturing, healthcare, food processing, logistics, and retail. With PPE detection, you can automatically detect if a person is wearing a specific type of PPE. You can use the detection results to send a notification or to identify places where safety warnings or training practices can be improved.
- Sentiment and demographic analysis: It interprets emotional expressions such as happy, sad, or surprise, and demographic information such as gender from facial images. Amazon Rekognition can analyze images, and send the emotion and demographic attributes to Amazon Redshift for periodic reporting on trends such as in store locations and similar scenarios. Note that a prediction of an emotional expression is based on the physical appearance of a person’s face only. It is not indicative of a person’s internal emotional state, and Rekognition should not be used to make such a determination.
- Facial Search: With Amazon Rekognition, you can search images, stored videos, and streaming videos for faces that match those stored in a container known as a face collection. A face collection is an index of faces that you own and manage.
- Unsafe content detection: It can detect adult and violent content in images and in stored videos. Developers can use the returned metadata to filter inappropriate content based on their business needs. Beyond flagging an image based on the presence of unsafe content, the API also returns a hierarchical list of labels with confidence scores. These labels indicate specific categories of unsafe content, which enables granular filtering and management of large volumes of user-generated content (UGC). Examples include social and dating sites, photo sharing platforms, blogs and forums, apps for children, ecommerce sites, entertainment, and online advertising services.
- Celebrity recognition: It can recognize celebrities within supplied images and in videos. Amazon Rekognition can recognize thousands of celebrities across a number of categories, such as politics, sports, business, entertainment, and media.
- Text detection: Amazon Rekognition Text in Image enables you to recognize and extract textual content from images. Text in Image supports most fonts, including highly stylized ones. It detects text and numbers in different orientations, such as those commonly found in banners and posters. In image sharing and social media applications, you can use it to enable visual search based on an index of images that contain the same keywords. In media and entertainment applications, you can catalog videos based on relevant text on screen, such as ads, news, sport scores, and captions. Finally, in public safety applications, you can identify vehicles based on license plate numbers from images taken by street cameras.
- Custom labels: With Amazon Rekognition Custom Labels, you can identify the objects and scenes in images that are specific to your business needs. For example, you can find your logo in social media posts, identify your products on store shelves, classify machine parts in an assembly line, distinguish healthy and infected plants, or detect animated characters in videos. For more information, see What is Amazon Rekognition Custom Labels? in the Amazon Rekognition Custom Labels Developer Guide.
In this project, the aim is to build out an AWS Lex Chatbot and Amazon Rekognition Website and at the end of the project, you will be able to:
- Create a chatbot using AWS Lex
- Understand intents, slots and utterances
- Be able to add buttons to the chatbot responses
- Customise the responses that chatbots have using AWS Lambda
- Deploy the chatbot as a website using Amazon CloudFormation
- Use Amazon Rekognition to identify objects
- Create a website using HTML, CSS and Javascript
- Integrate Lex into a basic website
- Host a public website using Amazon S3 and Amazon CloudFront
Let’s get started!!
Building the chatbot
For this project we will use Amazon Cloudfront, Cloudformation, Cognito, Lambda, Lex, S3 and Rekogntion. I recommend having a code editor such as Visual Studio Code , to complete Amazon Rekogntion website integration and Amazon Lex website integrationBasic Voice Interactions
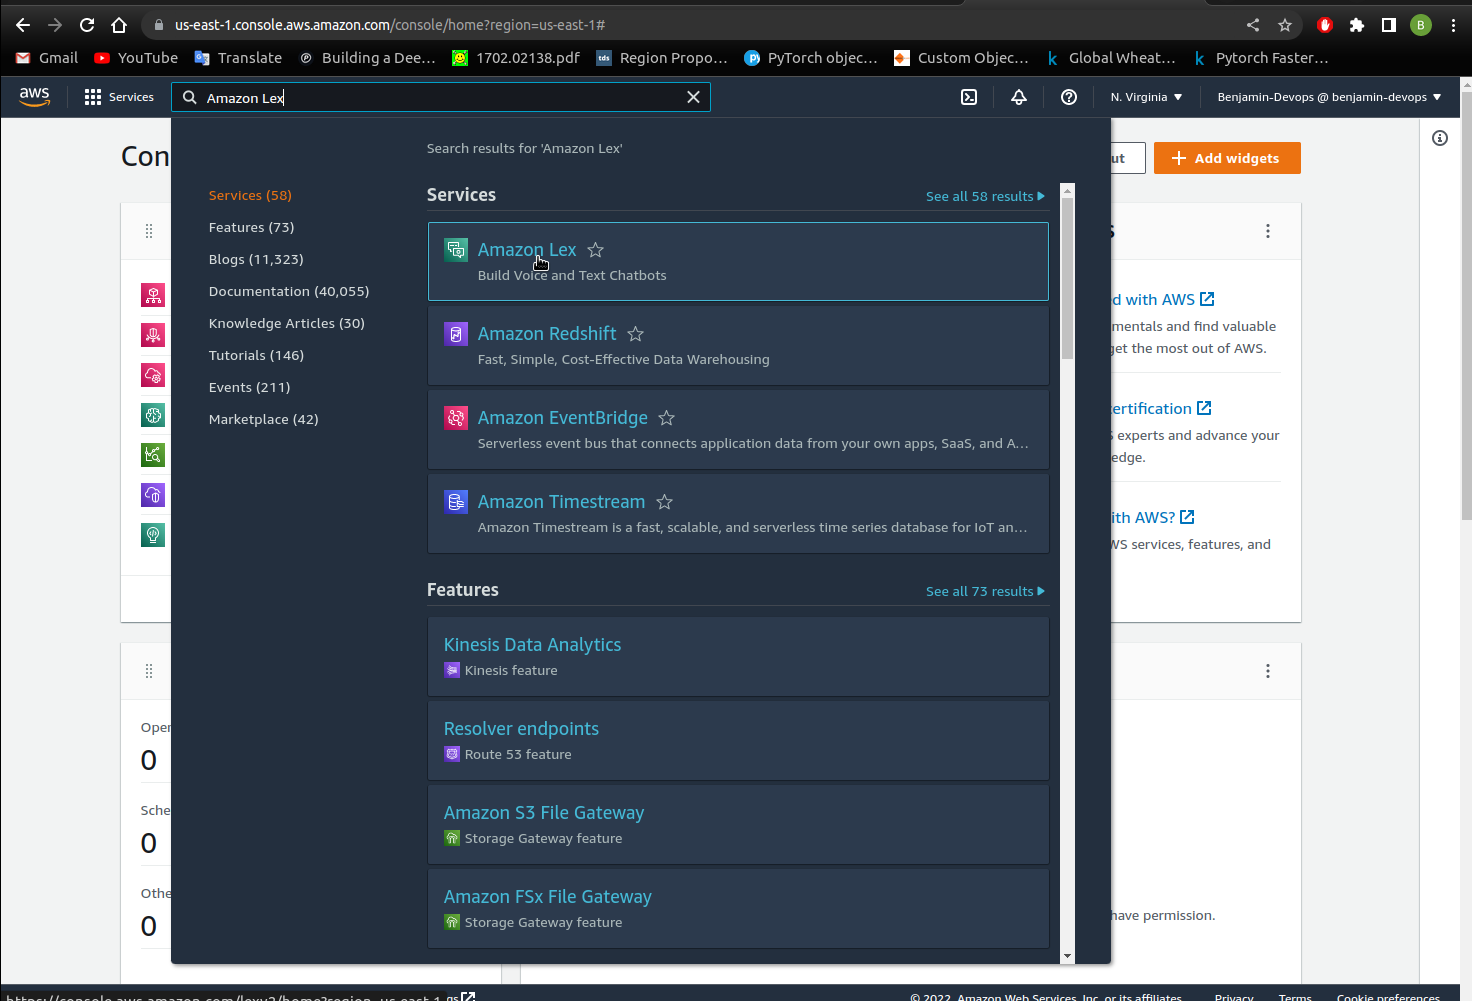
- Once you have logged into the AWS Console, search for Amazon Lex in the search bar like the picture below.
- Click on the Amazon Lex console to see the below page and click on the
Get Startedbutton. Note that I am using the V1 console for the Amazon Lex service. If your version is V2 you can switch to the V1 console.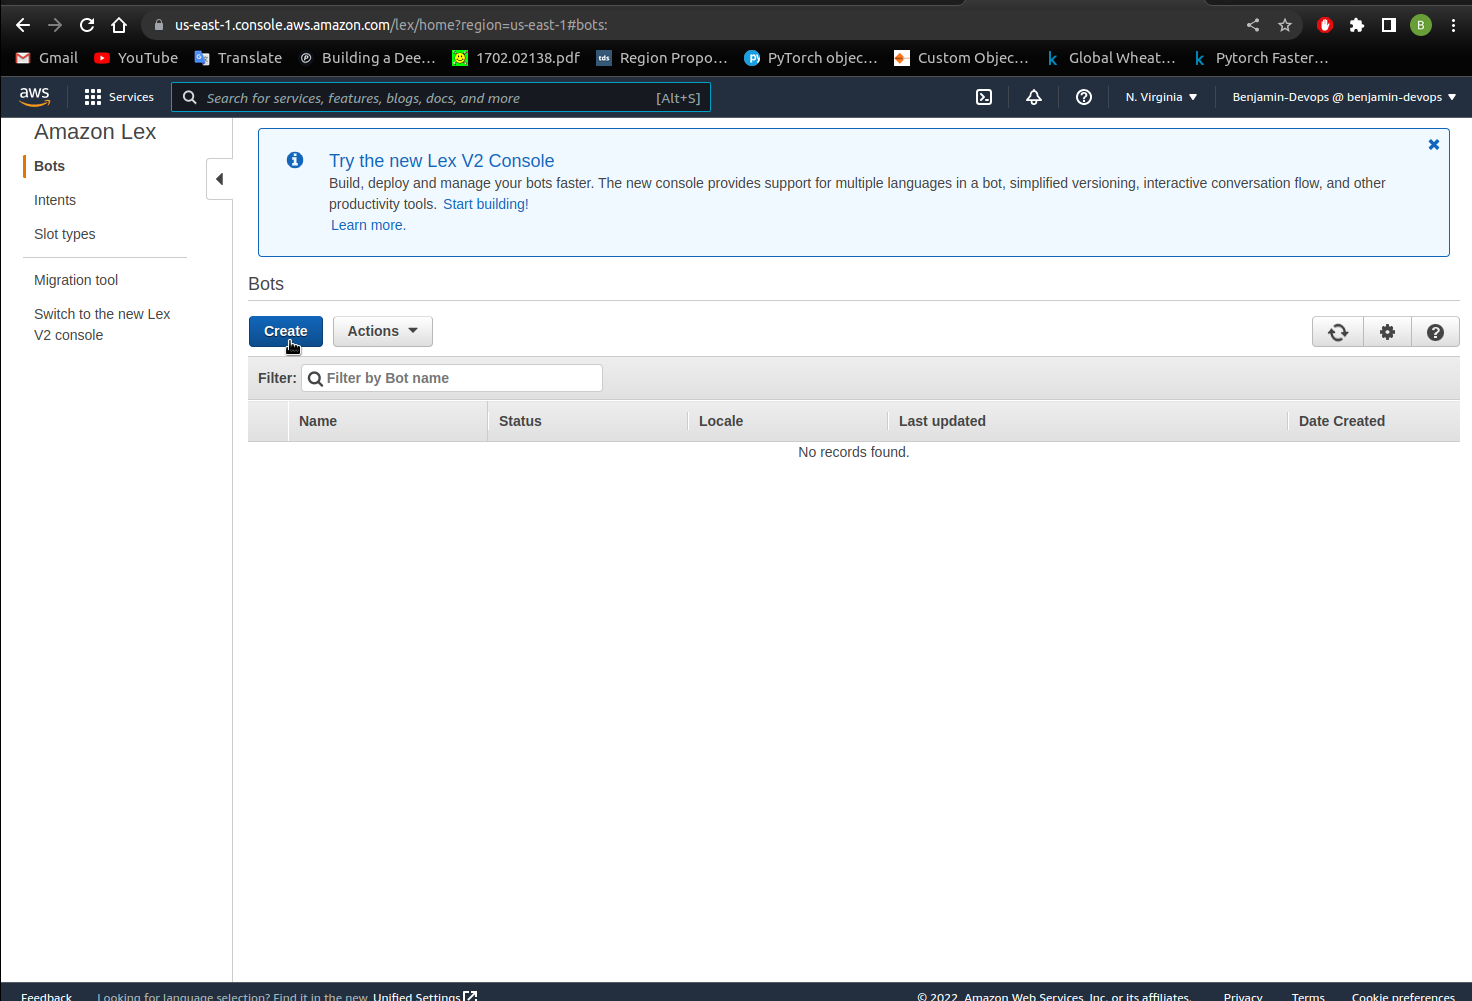
-
Select
Custom Botand fill in the page with the below information.Field Value Custom Name CanteenBot Language English(UK) Output Voice Amy Session Timeout 5 Sentiment Analysis No IAM Role Leave as is COPPA Yes - Click
Create - You should see the below image and start creating the chatbot by clicking
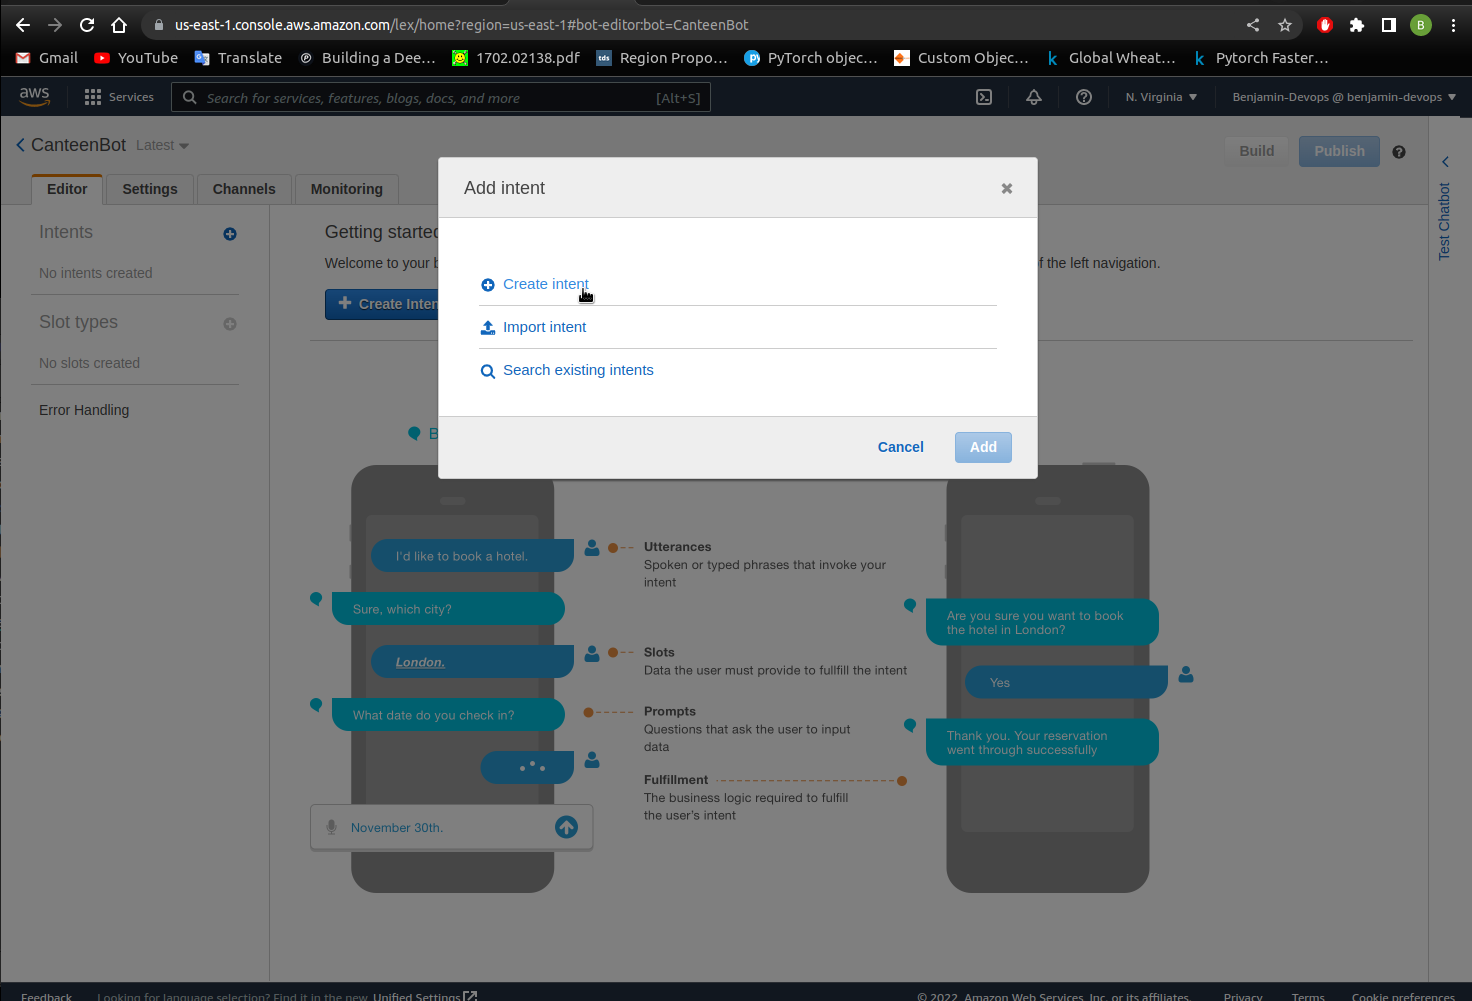
Create Intentand also clickingCreate Intentin the popup window. An intent represents an action that users want to perform. You create a bot to support one or more related intents. For example, you might create a bot that orders pizza and drinks. This would mean you’ll create an OrderFood intent and an OrderDrink intent as these are two separate actions.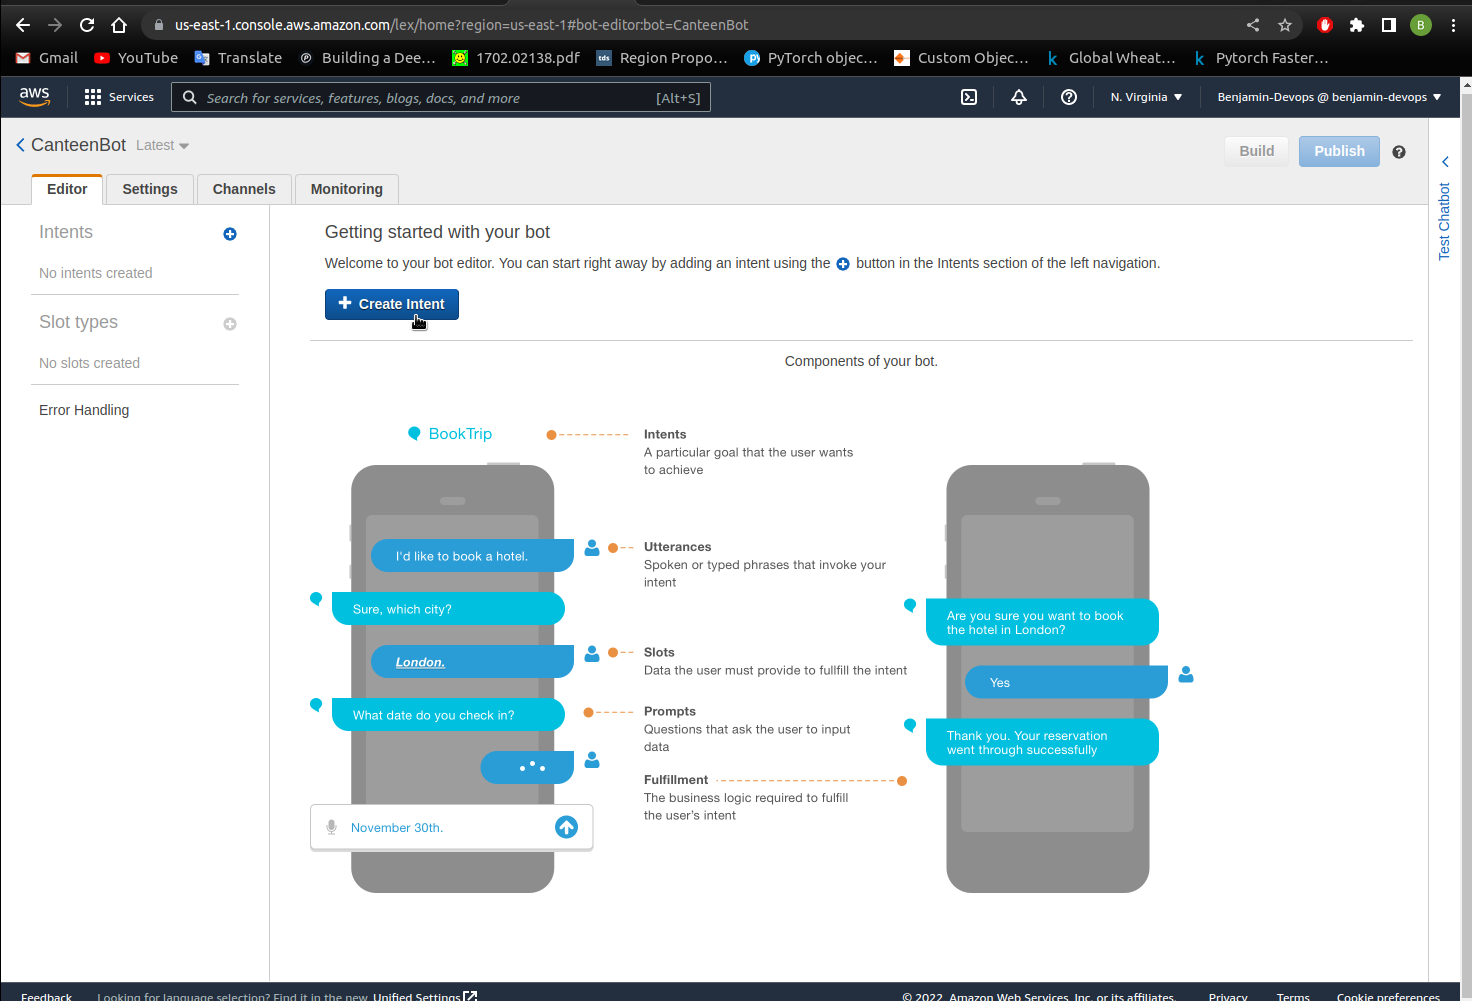
- Name your intent “OrderDrink” and click
Add. You should see the below images as a result. - Create the slot types that can be used in you sample utterances later on. Click on the plus sign next to slot types on the left hand side and click on
create slot type.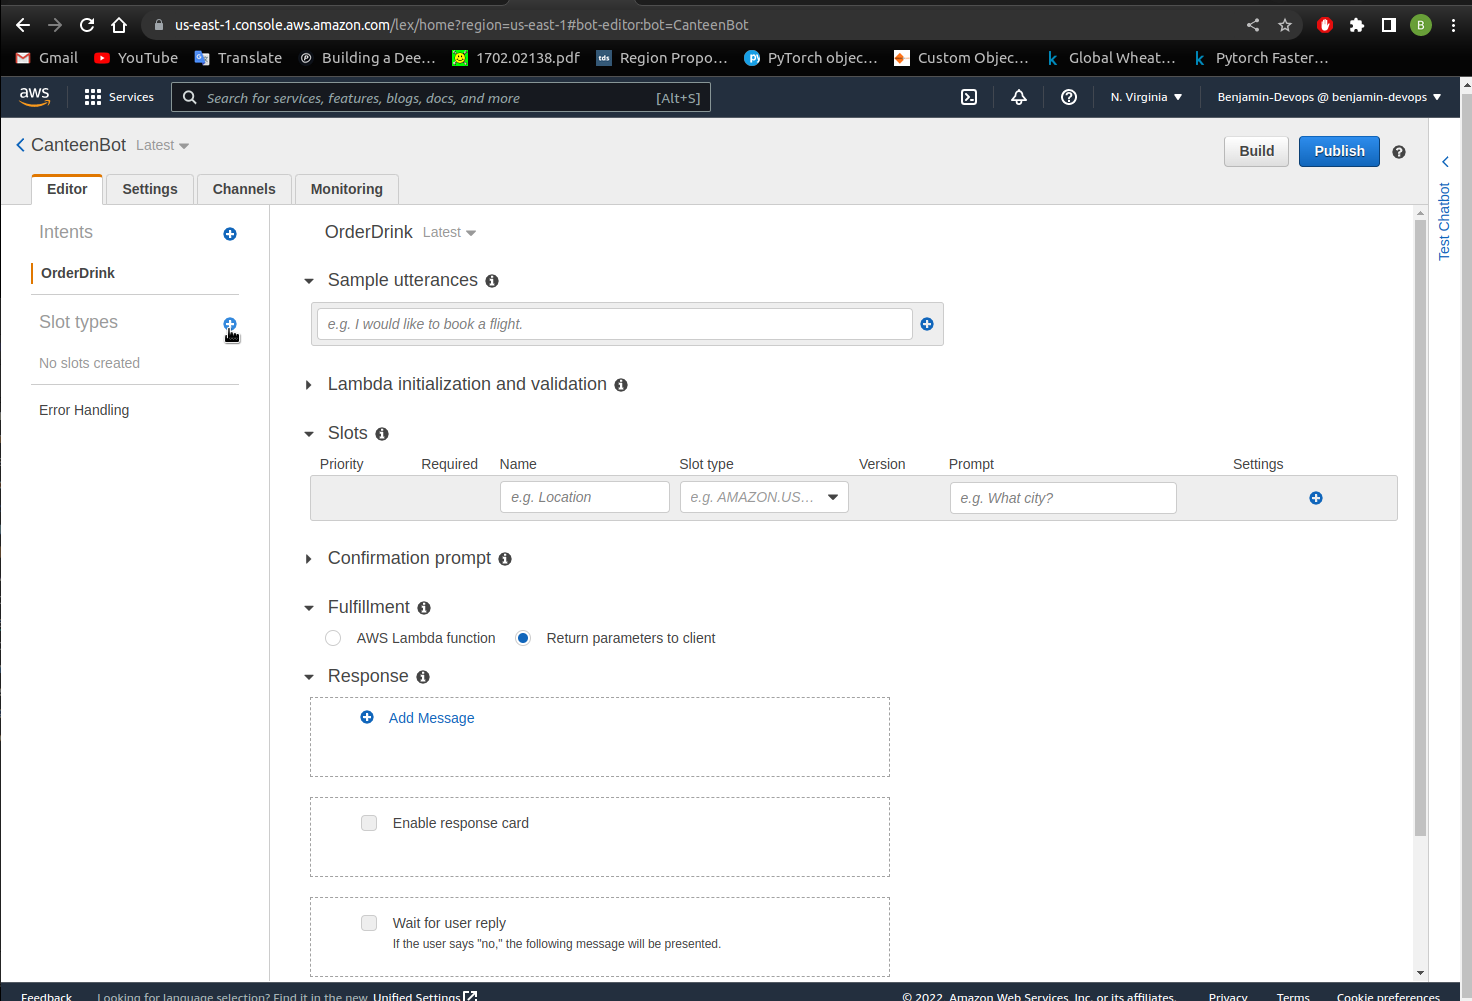
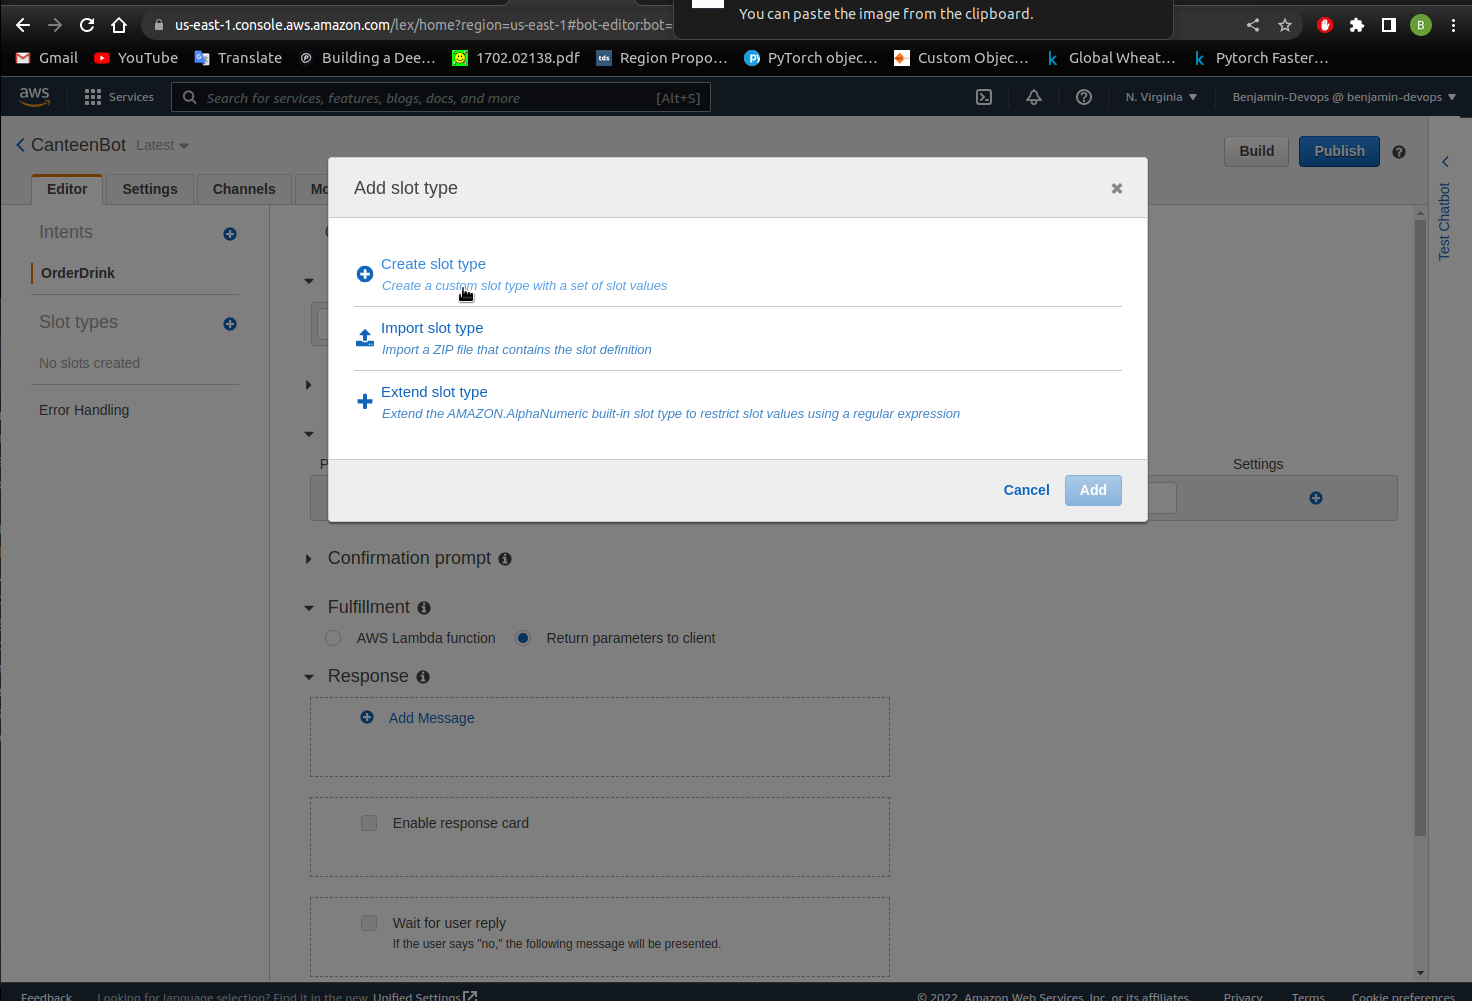
What are slot types? Each slot has a type. You can create your custom slot types or use built-in slot types. For example, you might create and use the following slot types for the intent:
Size – With values Small , Medium and Large.
Crust – With values Thick and Thin.
Amazon Lex also provides built-in slot types. For example, AMAZON.NUMBER is a built-in slot type that you can use for the number of pizzas ordered.
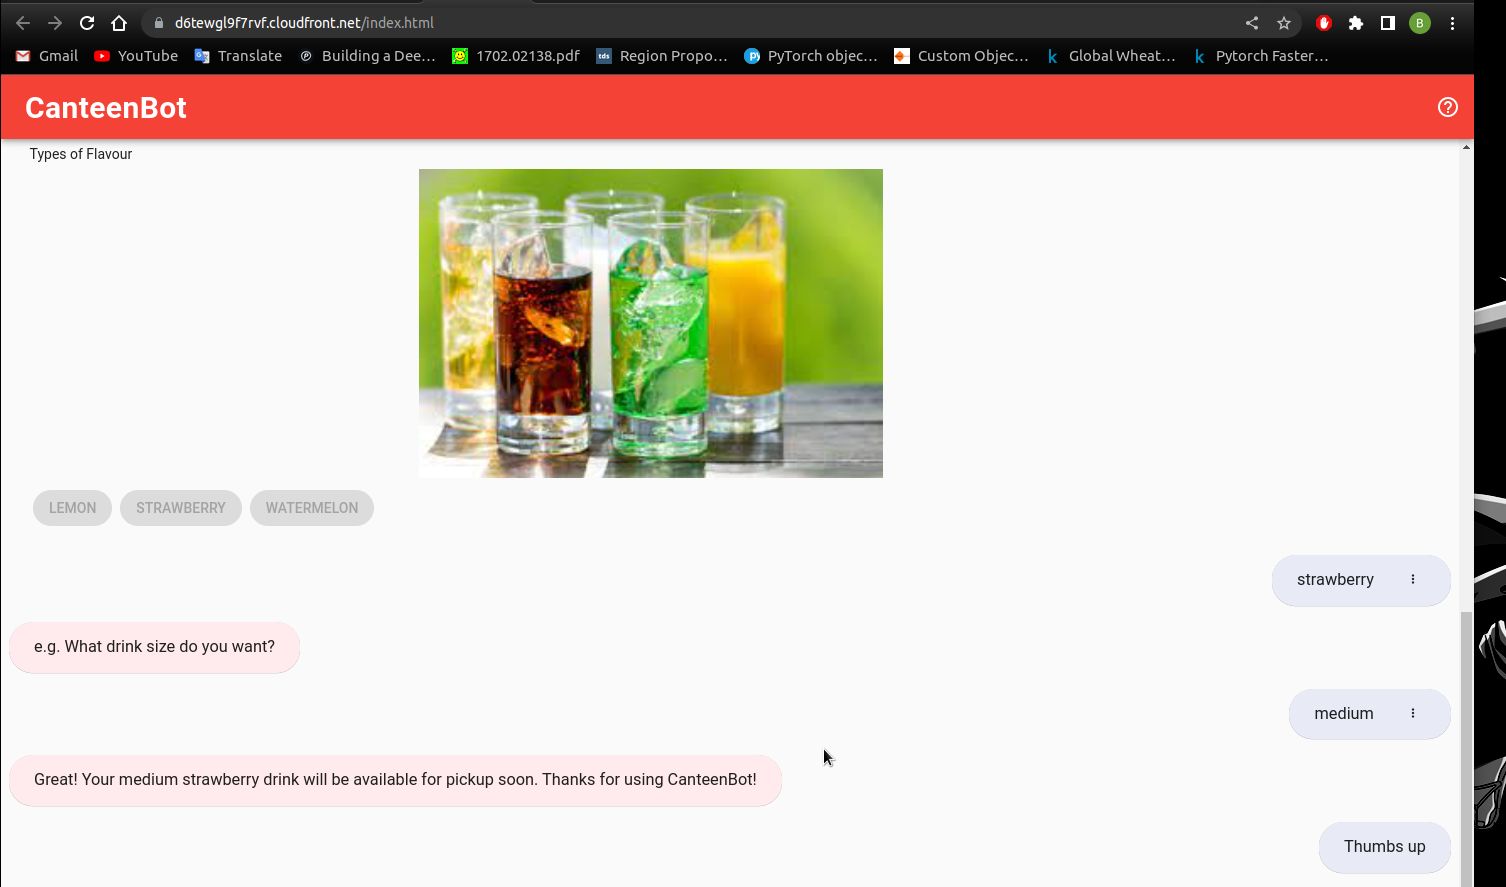
- Name the slot type as FlavourType and add the values strawberry, watermelon and lemon. Click
Add slot to intent. This can be seen in the images below.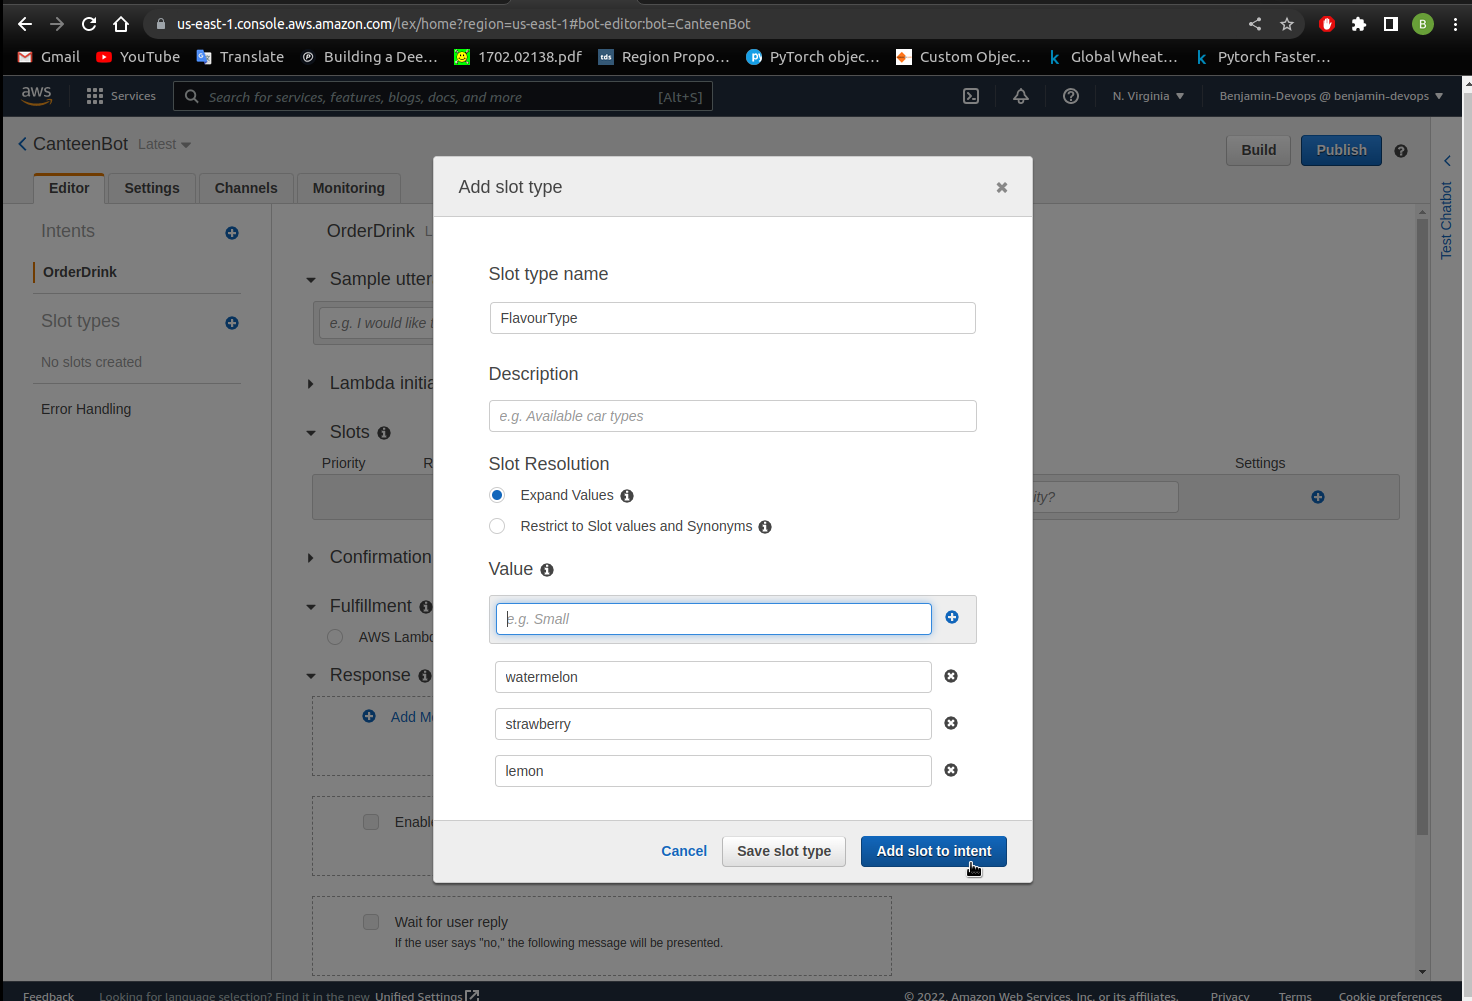
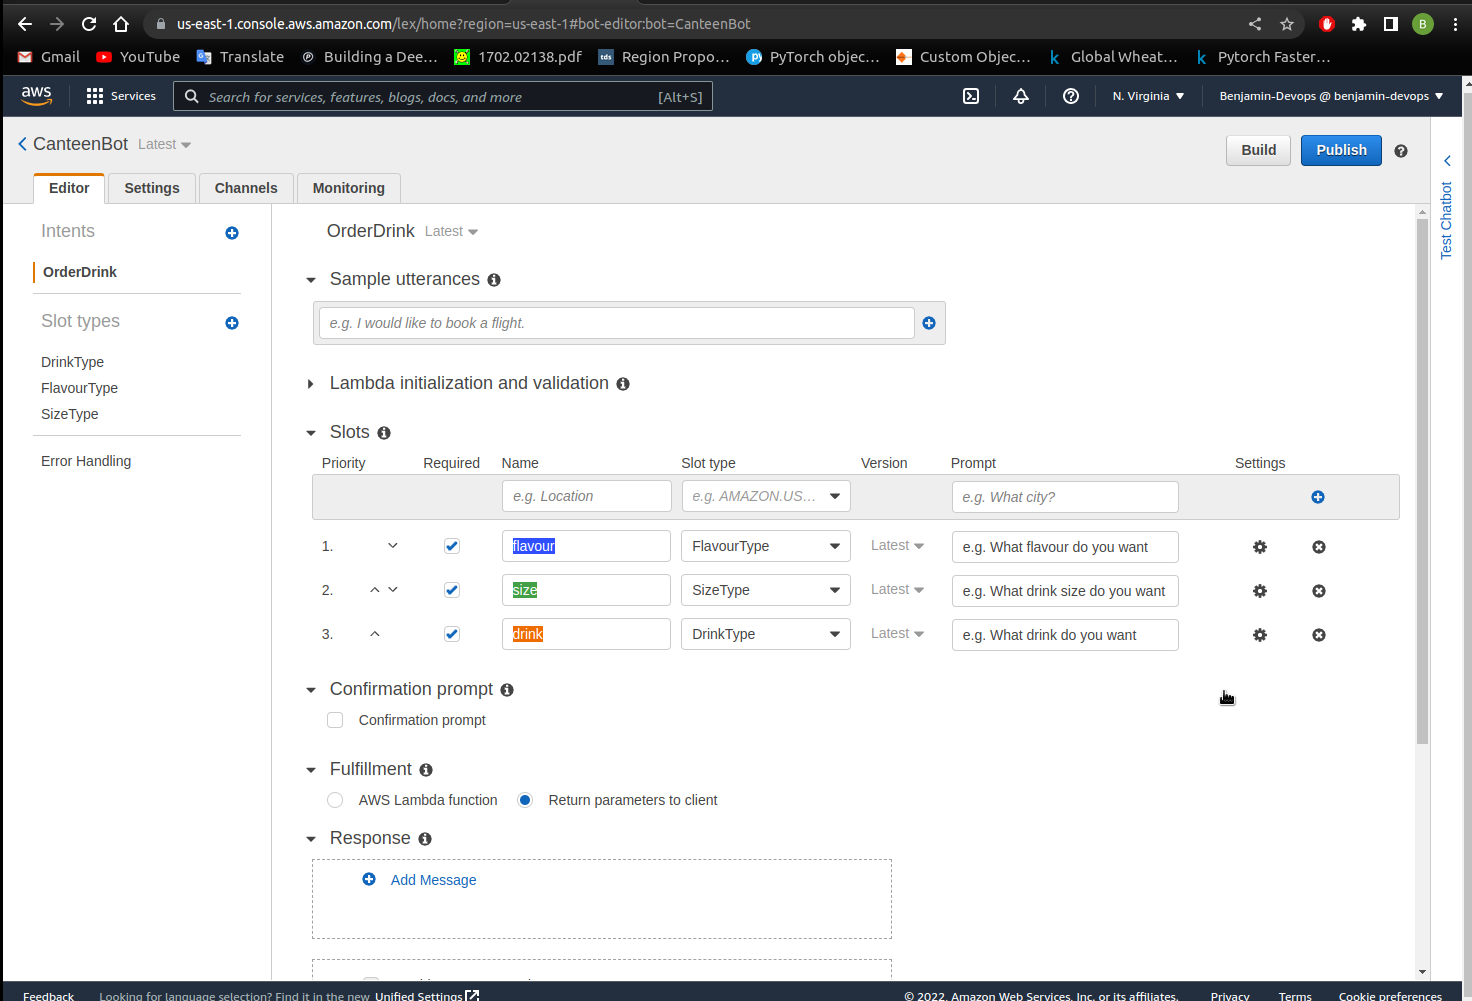
- Click on create slot type again and this time have the slot type name of SizeType with values of small, medium and large. Click
Add slot to intent. - Create the last slot type which is DrinkType and add the values ice tea, energy drink and flavoured water. Click
Add slot to intent. - Within the slots section, change the name and prompt for the corresponding slots. Repeat this for flavour, size and drink slot types. Mark all slots as required and fill in the slots as shown in the image below.
What are slots? These are elements within your utterances that may change based on the user wanting different variations to their actions.
E.g. “I want to order a pepperoni pizza” versus “I want to order a vegetarian pizza.”
In this example, pepperoni and vegetarian can be classified as a slot called “flavour”. This means the sample utterance can be fulfilled with “I want to order a {flavour} pizza” instead.
When the chatbot starts running, Amazon Lex prompts the user for specific slot values. The user must provide values for all required slots before Amazon Lex can fulfill the intent.
- Input the sample utterances by copying and pasting the below text in the sample utterances text box and pressing Enter. You can input other utterances that you think a user would say when they order drinks from the canteen.
1. I would like a {size} {flavour} {drink} please
2. Can I have a {size} {drink}
3. I want a {drink}
What are utterances? What a user might say to trigger this intent. For example, a user might say “Can I order a pizza please” or “I want to order a pizza”.
Note: Make sure to leave a space before and after the slot values.
Incorrect Declaration due to no spaces between the slots - {size}{drink}{flavour}
Correct Declaration - {size} {drink} {flavour}
- Click
Buildon the top right corner of the page. - Test the bot by clicking the right hand side
Test Chatbottoolbar to expand the chatbot window. - Type
I would like a small watermelon energy drink, there should be a response ofIntent OrderDrink is ReadyForFulfillment: drink\:energy drink flavour\:watermelon size\:small. This can be seen in the image below.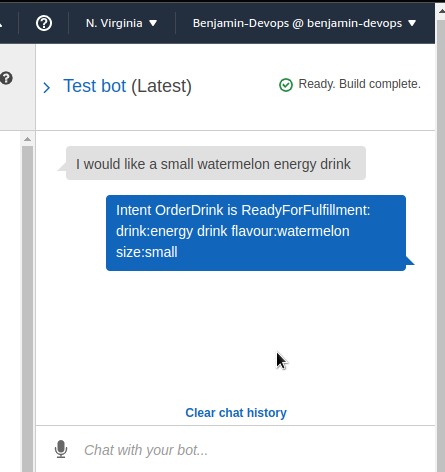
Congratulations, you have just built a basic voice interface for the chatbot! You built out a basic voice interaction using the Amazon Lex service. You also learnt about intents, slots, slot types and utterances and was able to make it function as intended.
Lambda Integration
In the previous section we were able to build out the basic voice interactions on Amazon Lex. The chatbot received your response and knows that you want to order a small watermelon energy drink. Now you need to add extra responses from the chatbot so your user knows that it has received it properly. To do this we will need to use the Lambda service.How to fulfill the intent? You can undertake custom actions once the intent is triggered. This can be done via code and we recommend that you create a Lambda function to fulfill the intent. Lambda Functions are pieces of code that you can write on the AWS console to perform custom actions.
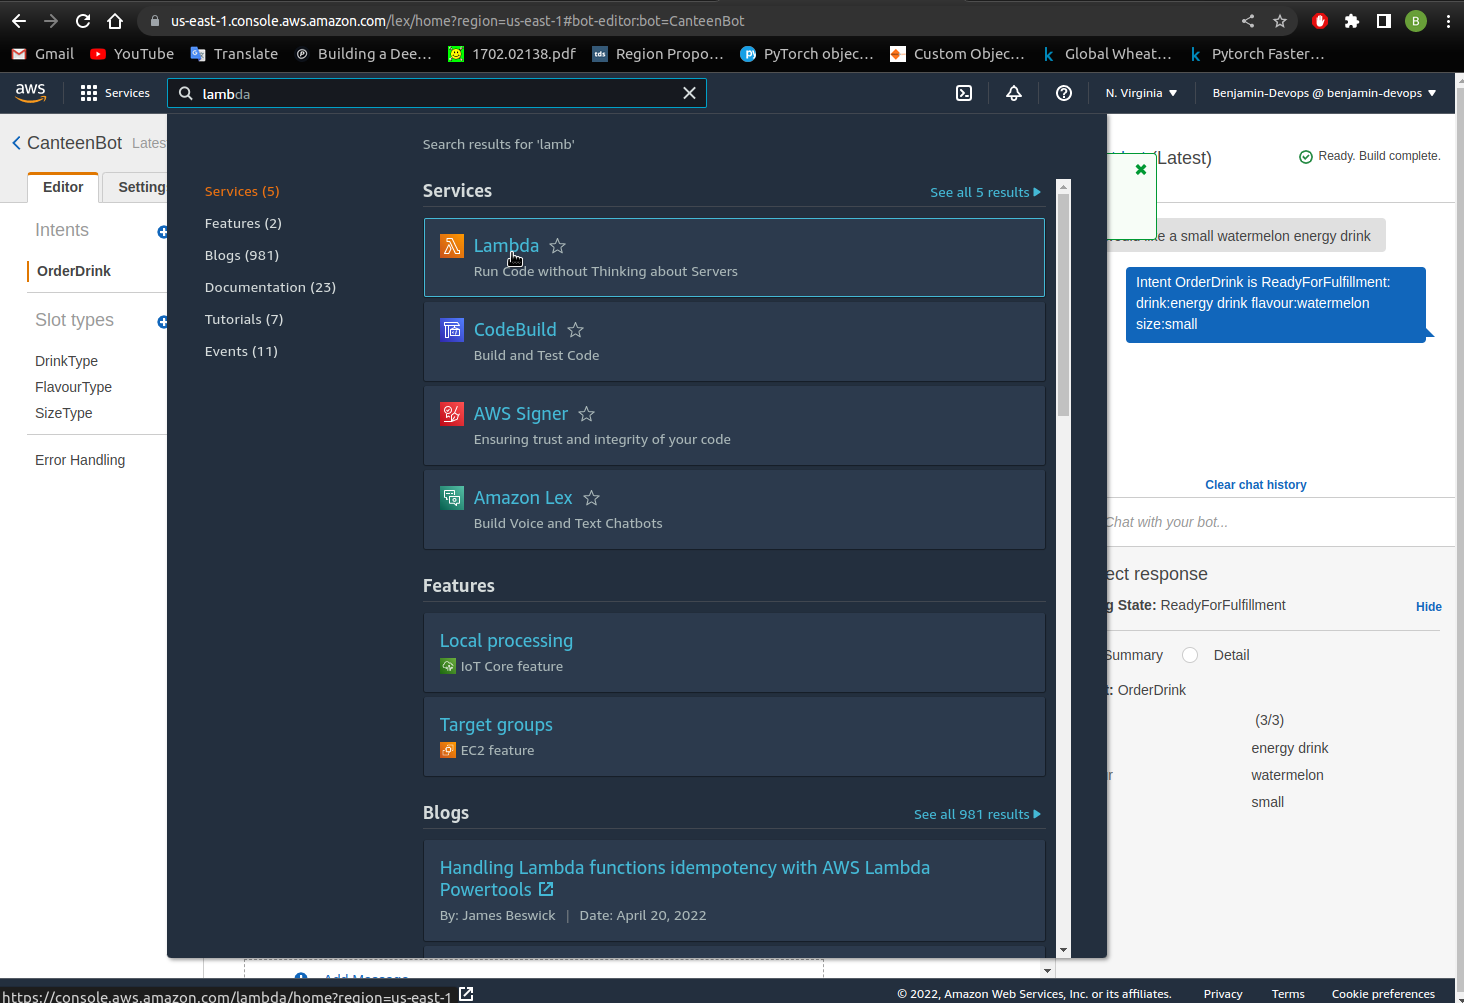
- Go to Lambda by searching for the service on the top left hand corner like below and click on the lambda service.
- You should see the below dashboard, so click
Create function.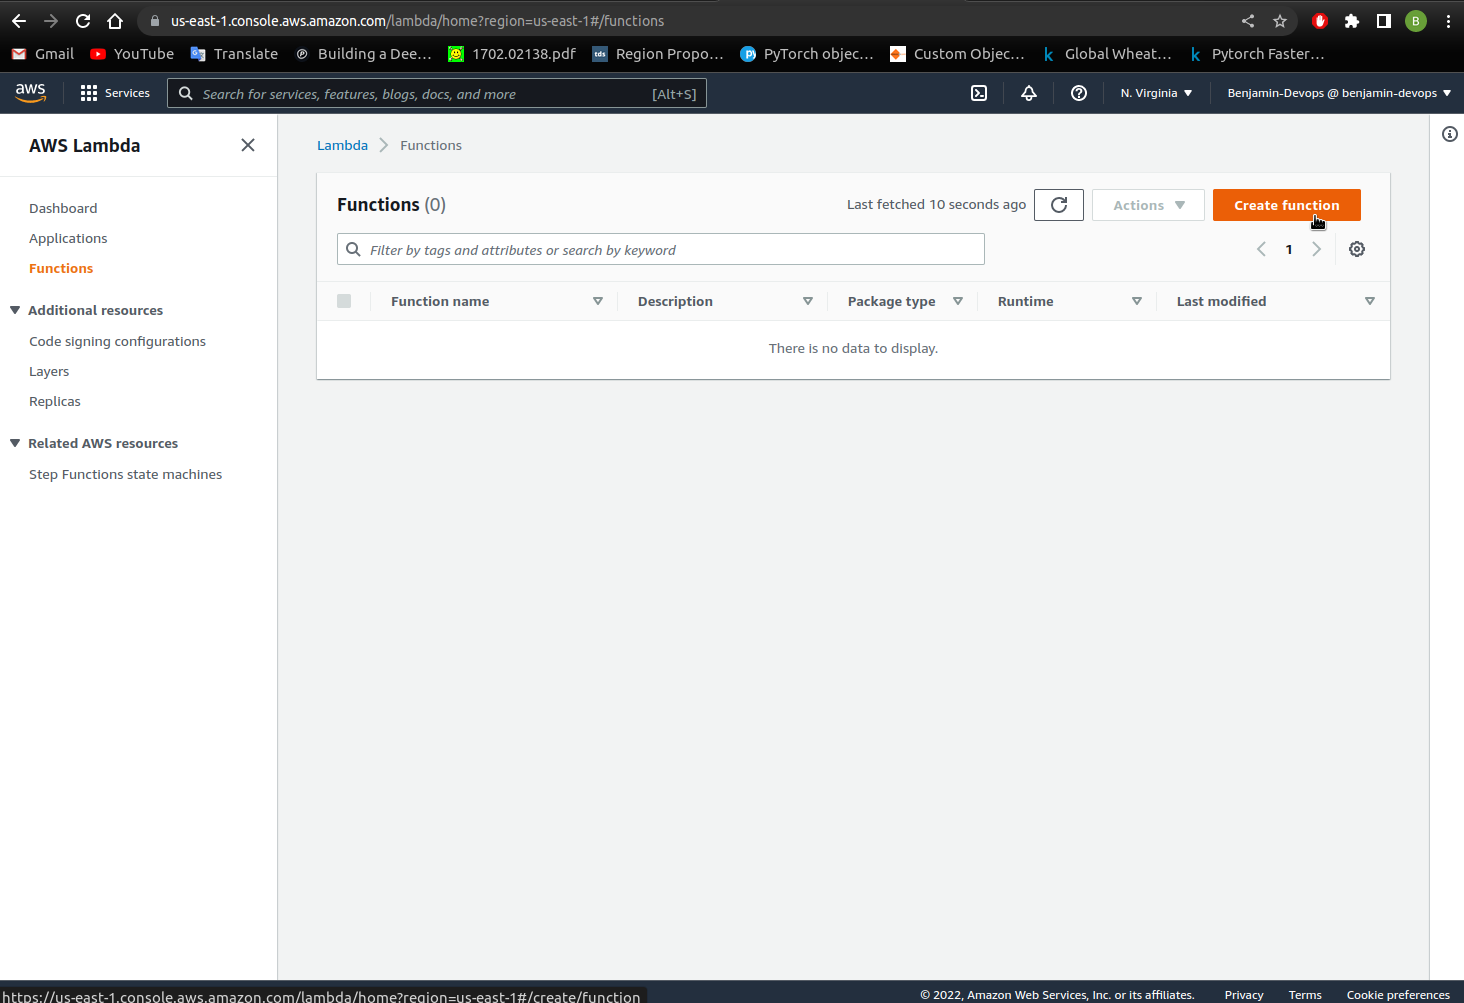
- Select
Author from scratchand set the function name asCanteenBot. Have the runtime set toNode.js.14.x. and clickCreate function.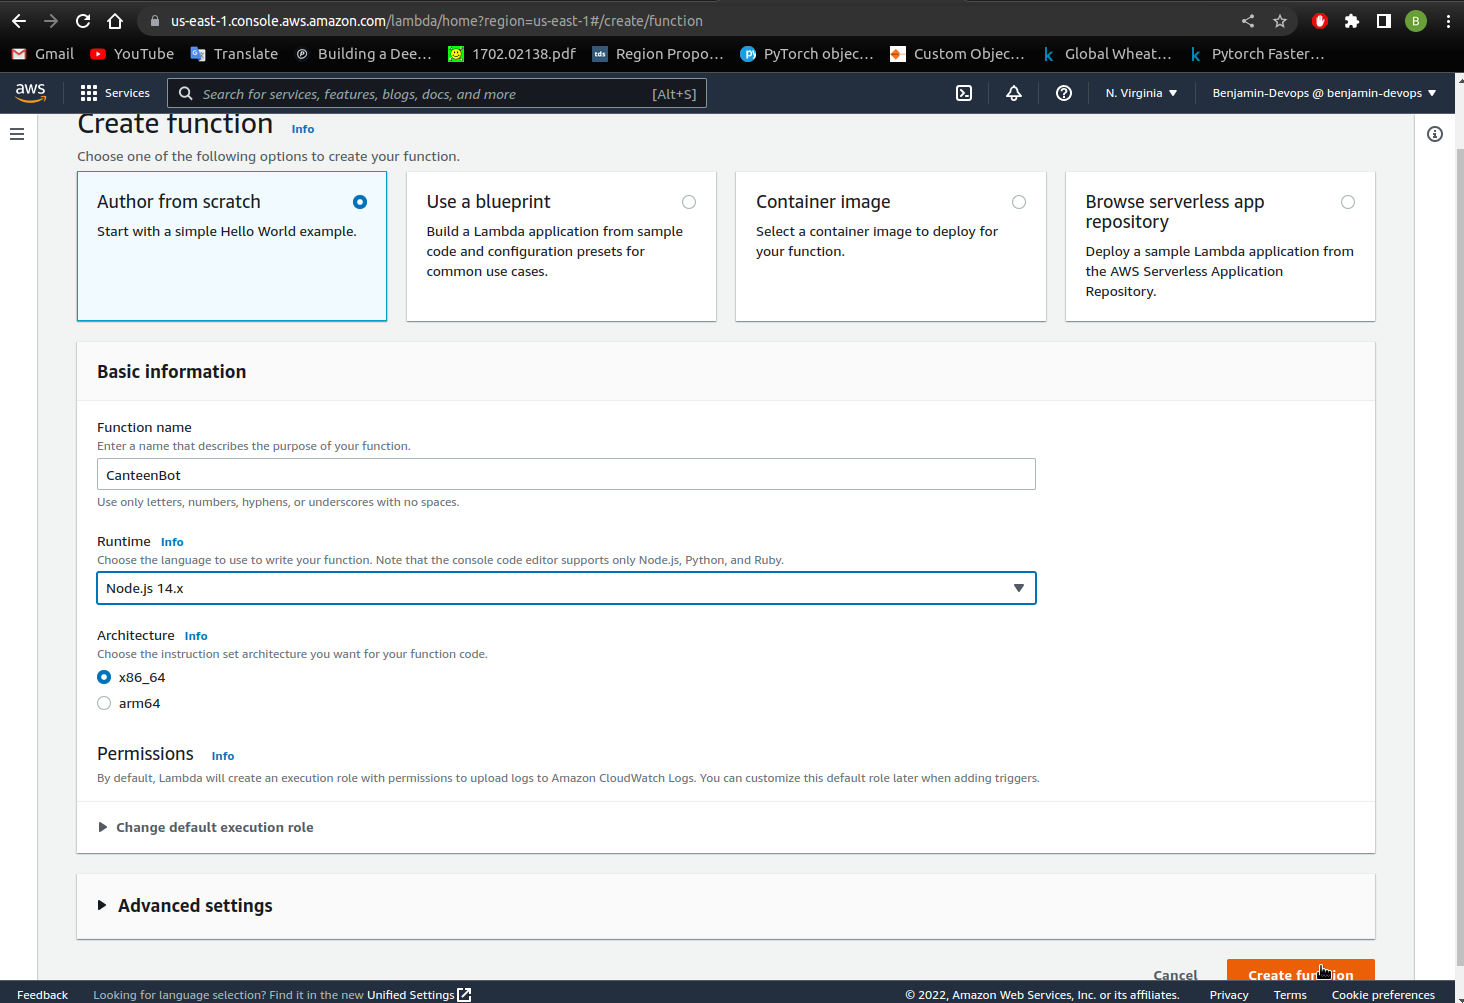
- Delete the code that is within index.js (highlighted in blue in the image below) and leave that file blank.
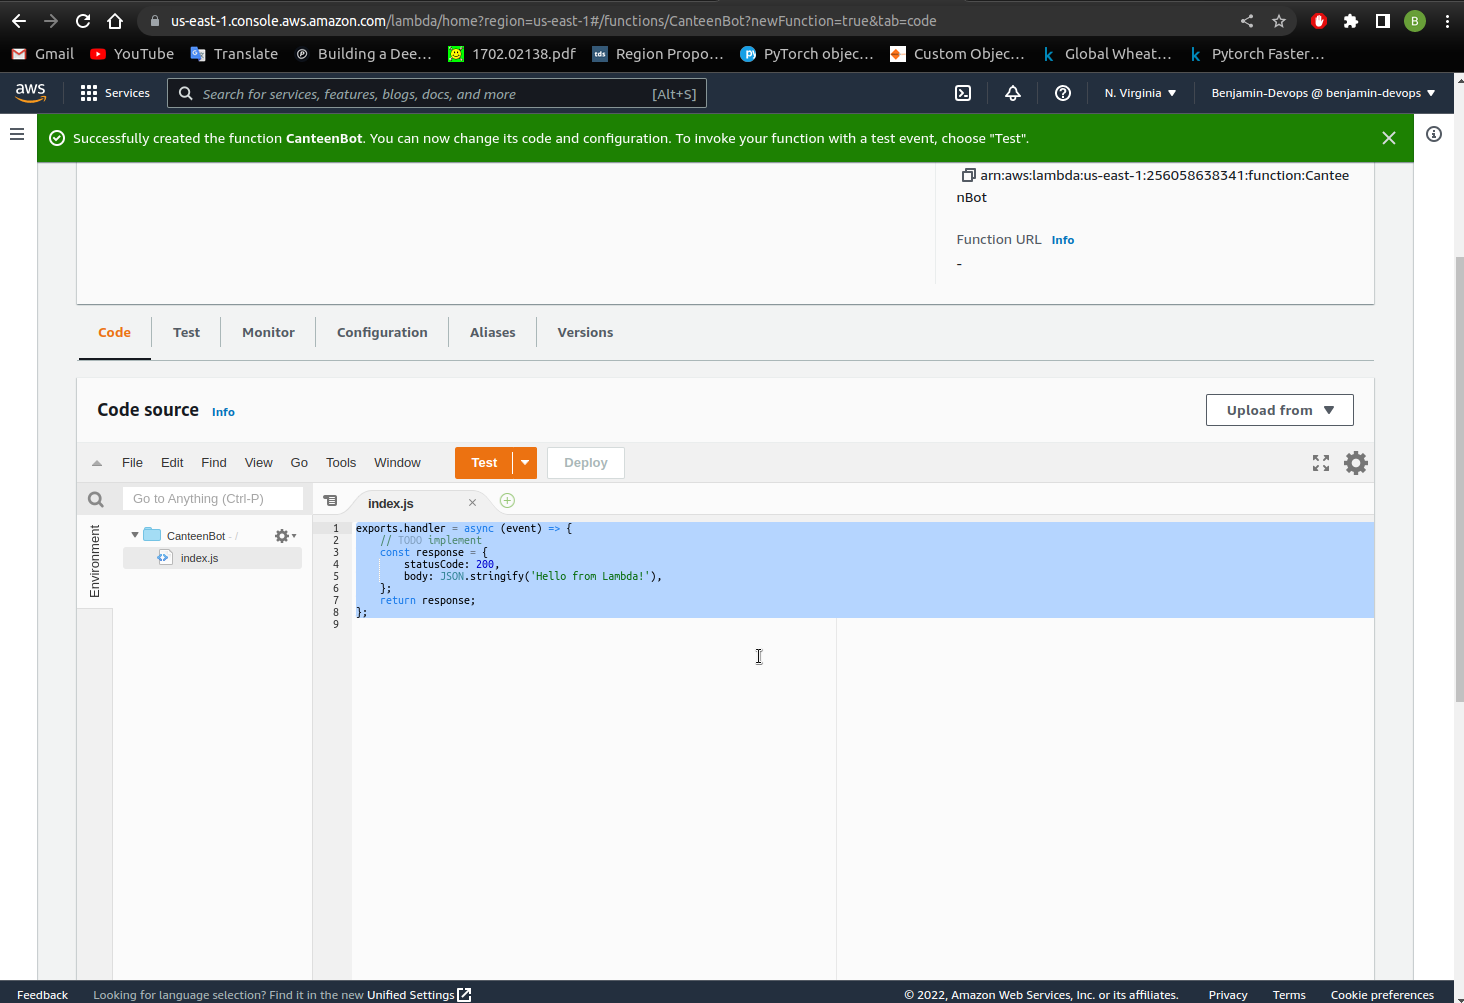
-
Copy and paste the below code within index.js.
'use strict'; // --------------- Helpers to build responses which match the structure of the necessary dialog actions ----------------------- function close(sessionAttributes, fulfillmentState, message, responseCard) { return { sessionAttributes, dialogAction: { type: 'Close', fulfillmentState, message, responseCard, }, }; } // --------------- Functions that control the skill's behavior ----------------------- //Used to fulfill the ordering for canteen food. //Function where the intent request is submitted and where you can customise. function OrderDrink(intentRequest, callback) { const outputSessionAttributes = intentRequest.sessionAttributes; const source = intentRequest.invocationSource; console.log(intentRequest); if (source === 'FulfillmentCodeHook') { //Used once all slots are fulfilled. const slots = intentRequest.currentIntent.slots; console.log(slots); const drink = slots.drink; const size = slots.size; const flavour = slots.flavour //Change anything after 'content:' to display another message //apart from the usual "Great! Your drink is available for pickup soon. Thanks for using CanteenBot!" //To refer to the drink, size and flavour variables - use ${drink}, ${size} and ${flavour} within your bracketed text. callback(close(outputSessionAttributes, 'Fulfilled', { contentType: 'PlainText', content: `Great! Your ${size} ${flavour} ${drink} will be available for pickup soon. Thanks for using CanteenBot!` })); return; } } // --------------- Intents ----------------------- /**Called when the user specifies an intent for this skill.*/ function dispatch(intentRequest, callback) { console.log(`intent=${intentRequest.currentIntent.name}`); const name = intentRequest.currentIntent.name; console.log(name); // dispatch to the intent handlers - checks if the intent is OrderDrink and then initiates that function. if (name.startsWith('OrderDrink')) { return OrderDrink(intentRequest, callback); } throw new Error(`Intent with name ${name} not supported`); } // --------------- Main handler ----------------------- // Route the incoming request based on intent. // The JSON body of the request is provided in the event slot. exports.handler = (event, context, callback) => { console.log(JSON.stringify(event)); try { dispatch(event, (response) => callback(null, response)); } catch (err) { callback(err); } }; /*MIT No Attribution Copyright 2021 Amazon.com, Inc. or its affiliates. All Rights Reserved. Permission is hereby granted, free of charge, to any person obtaining a copy of this software and associated documentation files (the "Software"), to deal in the Software without restriction, including without limitation the rights to use, copy, modify, merge, publish, distribute, sublicense, and/or sell copies of the Software, and to permit persons to whom the Software is furnished to do so. THE SOFTWARE IS PROVIDED "AS IS", WITHOUT WARRANTY OF ANY KIND, EXPRESS OR IMPLIED, INCLUDING BUT NOT LIMITED TO THE WARRANTIES OF MERCHANTABILITY, FITNESS FOR A PARTICULAR PURPOSE AND NONINFRINGEMENT. IN NO EVENT SHALL THE AUTHORS OR COPYRIGHT HOLDERS BE LIABLE FOR ANY CLAIM, DAMAGES OR OTHER LIABILITY, WHETHER IN AN ACTION OF CONTRACT, TORT OR OTHERWISE, ARISING FROM, OUT OF OR IN CONNECTION WITH THE SOFTWARE OR THE USE OR OTHER DEALINGS IN THE SOFTWARE.*/ - Click
Deployin the right-hand corner above the code console to save the code. - Click on
Serviceson the top left corner and search forLex. Click onAmazon Lexto go back to our previous Amazon Lex service. - Once you go back to Amazon Lex select your intent. Within the Fulfillment section of the page , select
AWS Lambda Functionand within the drop down chooseCanteenBot. A popup should appear like the image below. SelectOKto use the Lambda function. Version should be set toLatestby default.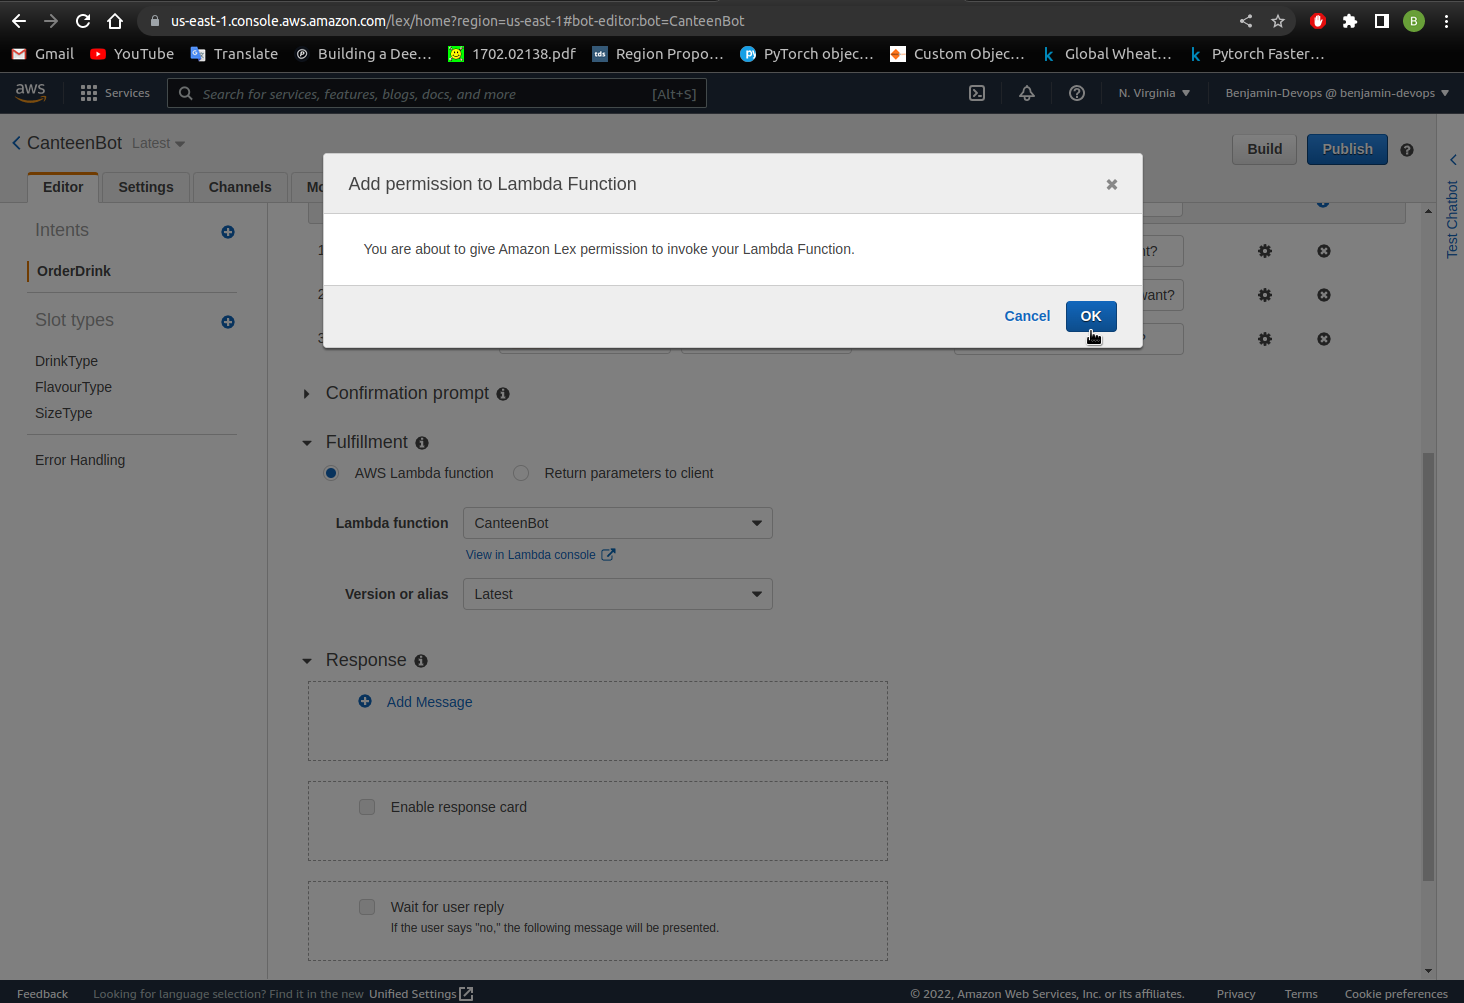
- Click
Buildon the top right-hand corner so Amazon Lex registers the lambda function. - Test the bot by clicking the right hand side
Test Chatbottoolbar to expand the chatbot window. - Type
I would like a small watermelon energy drink. If successful, there should be a response of “Great! your {drink} will be available for pickup soon. Thanks for using CanteenBot!”.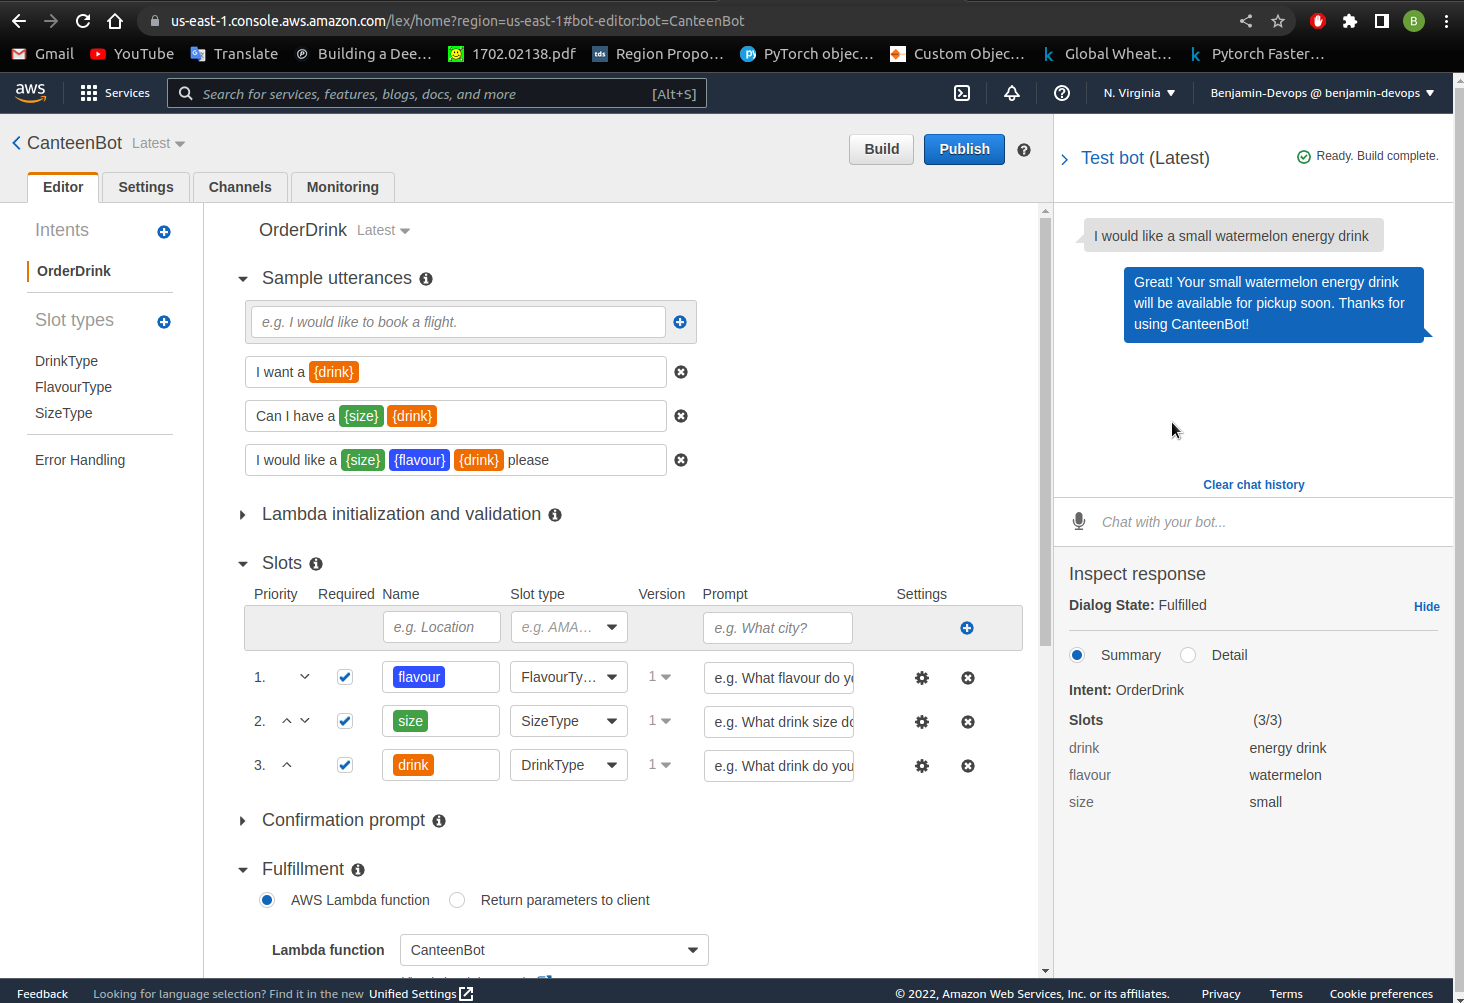
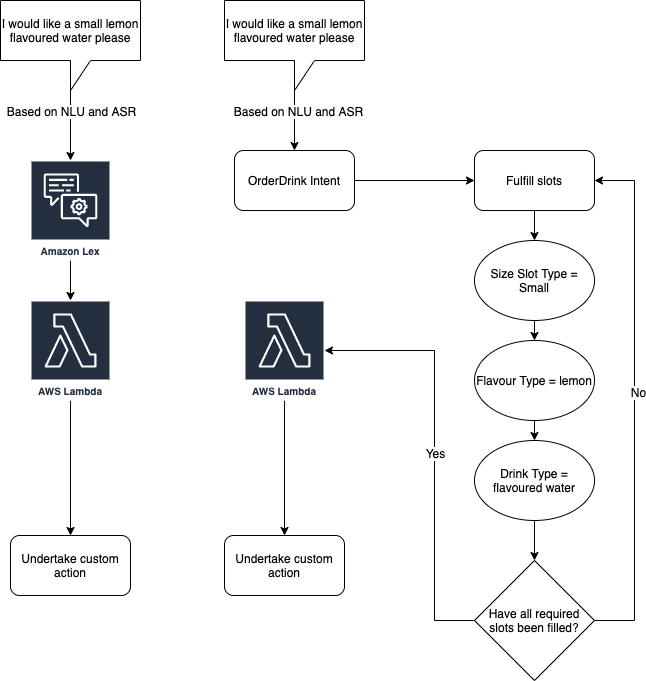
Congratulations ! You’ve built your first CanteenBot that can order drinks! You have been able to create an interactive chatbot by using Lambda to respond to the user interaction specified in the first section of this chatbot tutorial. To understand the flow diagram for the chatbot, you can observe this below.
Additional Features
In this section, we are going to add buttons to the responses of your questions to enhance the chatbot. We are also going to use a prepared template to launch the chatbot into a live website.Adding Buttons
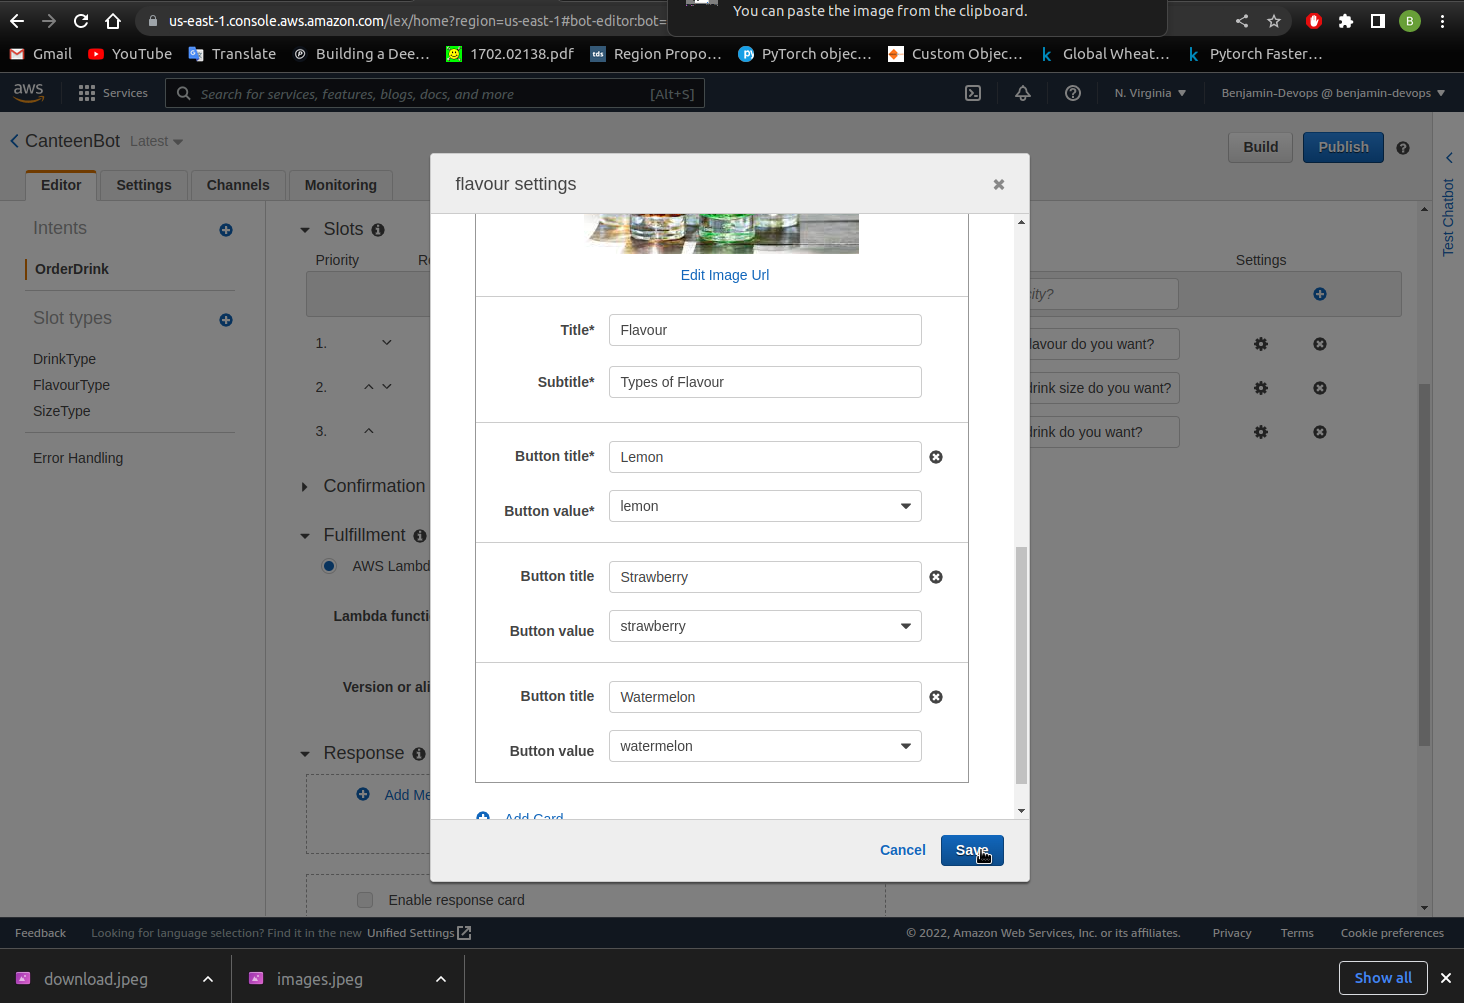
1. Go to the Amazon Lex console and select your chatbot by clicking on the name.2. Go to the slot where you want to see buttons for the responses and select the settings icon on the far right.
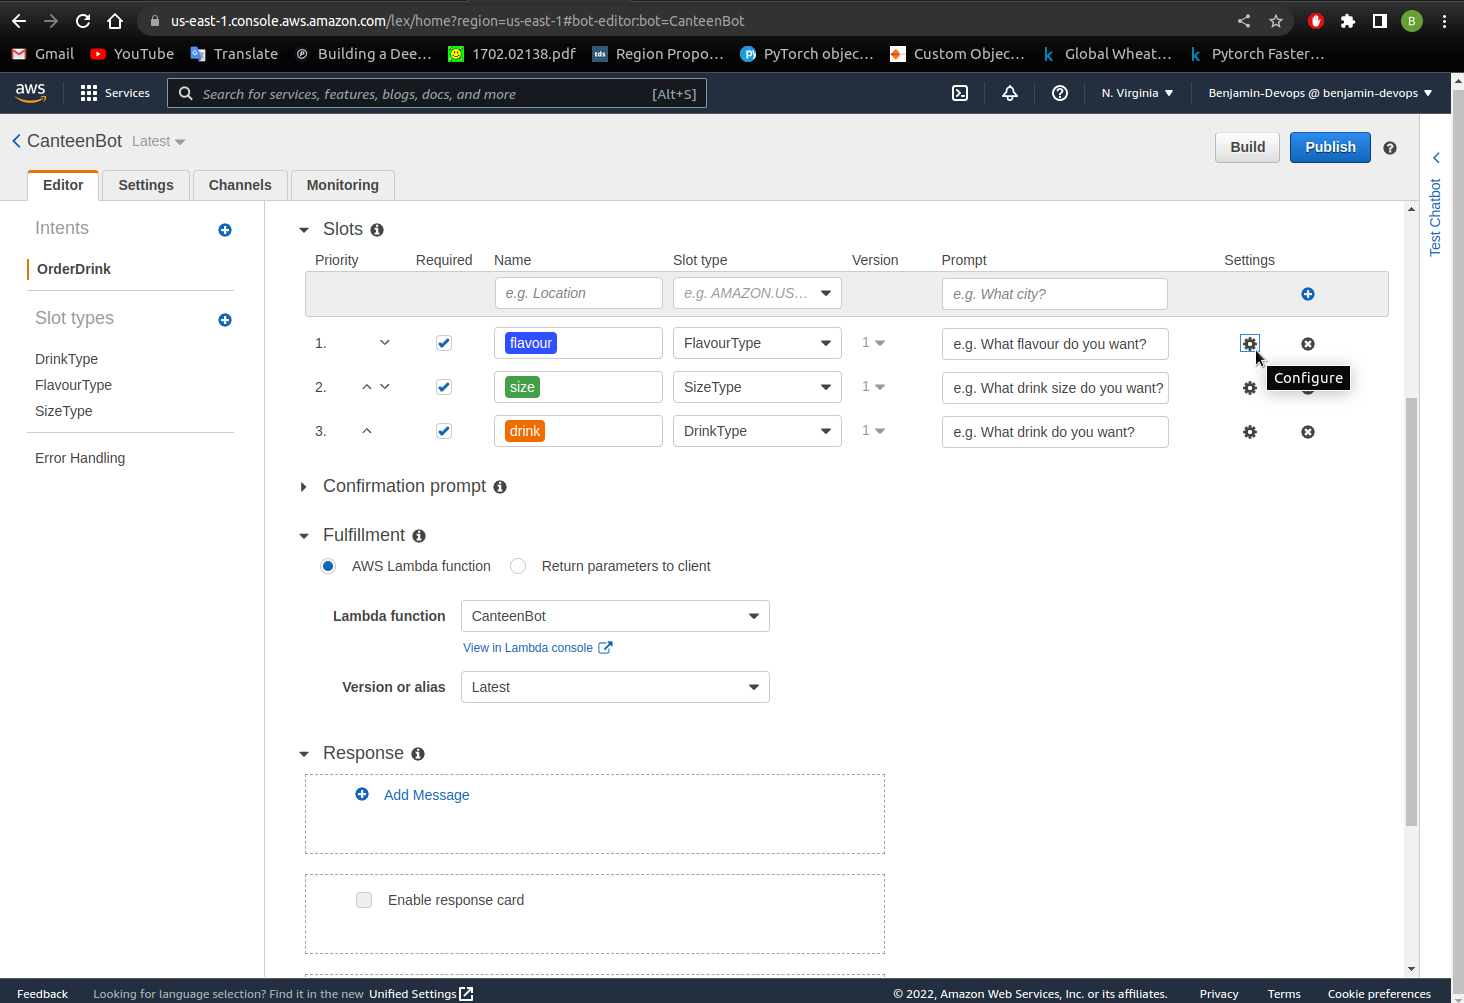
3. A popup should appear as below and you can scroll down to fill in the values corresponding to the buttons and click Save.
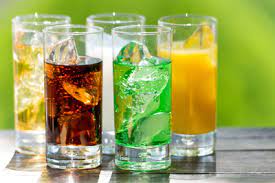
Note: Make sure to fill in the title, subtitle section, button title and button values. The image url section should be this url https://raw.githubusercontent.com/Ben74x/devfolio/master/content/blog/Image%20Recognition%20and%20Chatbot%20Website%20Using%20AWS/drinks.jpeg. You can also use your own image but make sure it ends with an image format (.png, .jpeg)
- Build the chatbot.
- Test the chatbot by typing
I want a drinkand an image with the corresponding options as buttons should be displayed.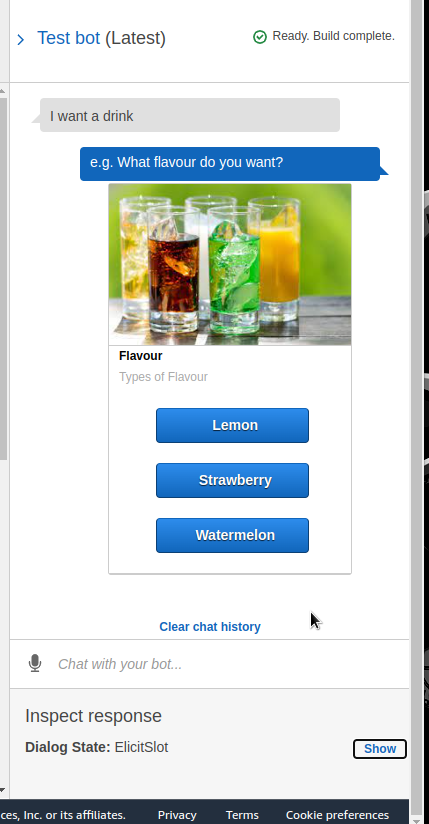
You should now see buttons for your responses!
Lex Website
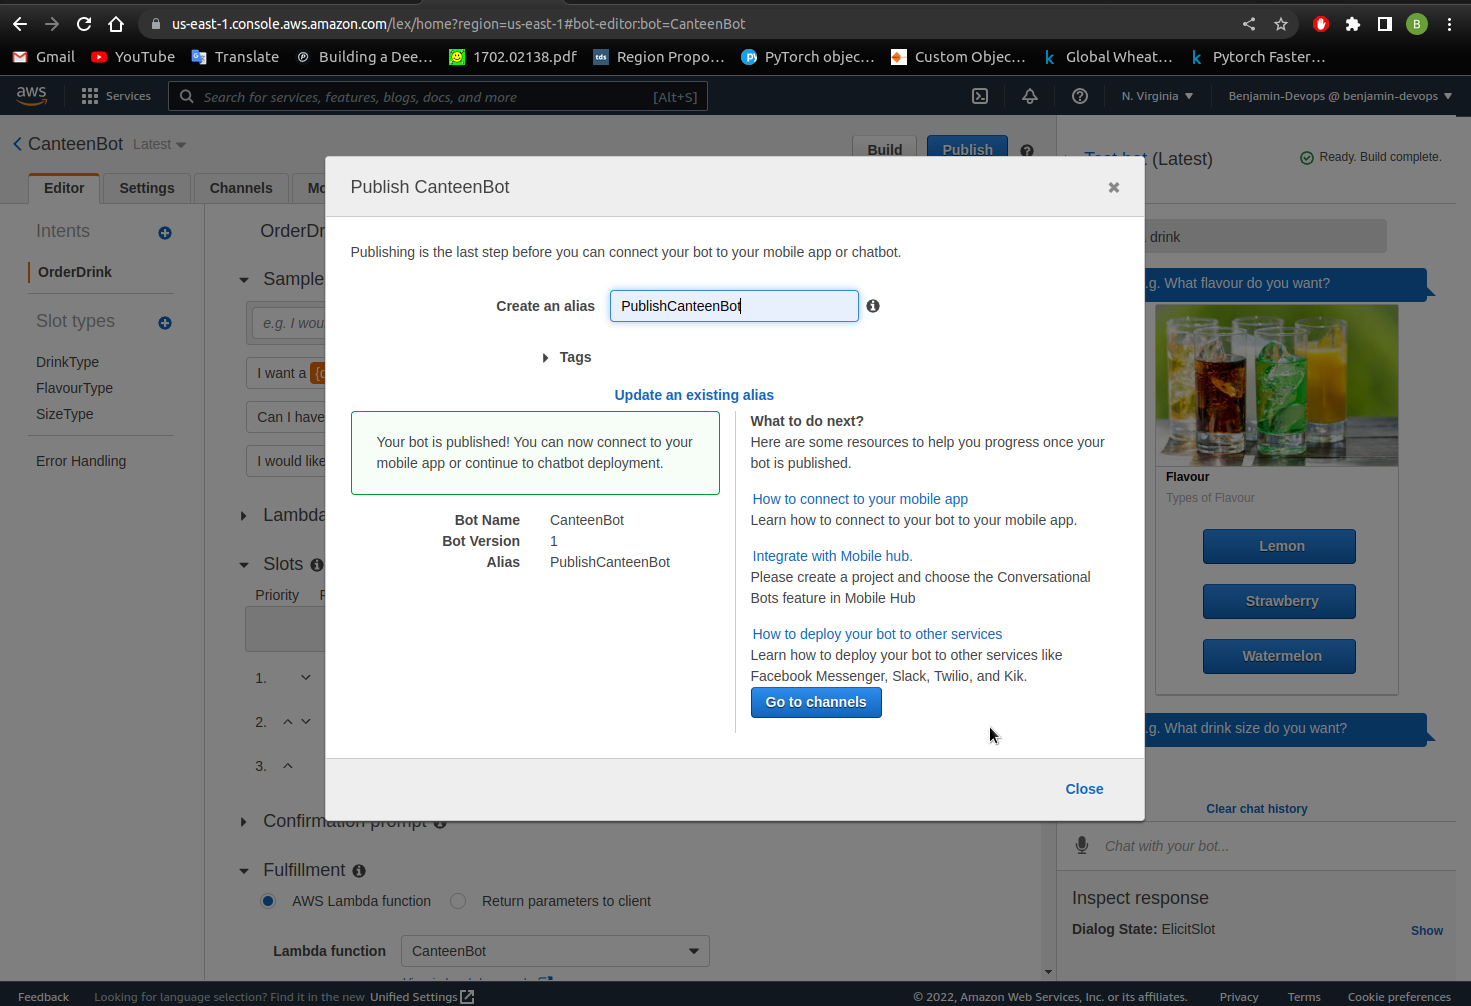
- Once you have finished making your chatbot. You can publish it by clicking on the publish button on the top right.
- Type in
PublishCanteenBotas the alias in the popup window and click Publish. - Publishing the chatbot will take a few seconds with the below popup appearing once published. Copy down the BotName and alias as you will use this at a later step.
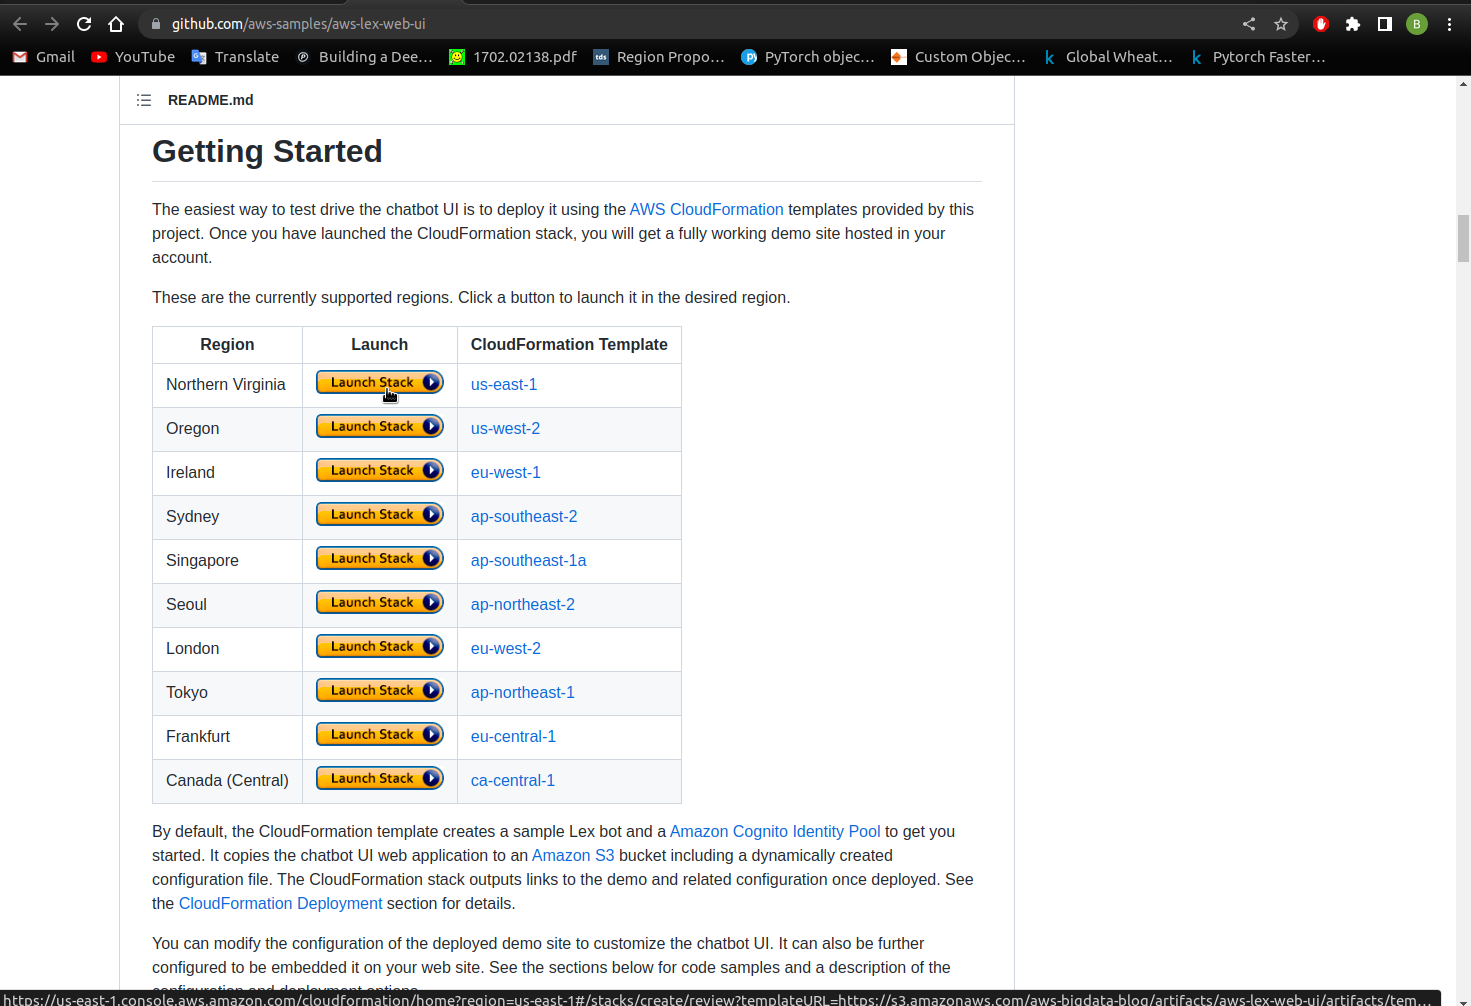
- Open another tab and go to the link The AWS Samples github Lex Web UI page. It is a github repo that contains stacks on Amazon Lex web interface quick setups.
- Scroll down the page until you see the Getting Started section and click on deploy stack for the Northern Virginia (us-east-1) region (or the region you have been using in this workshop) as seen with the below screenshot.
- Set the Stack Name as
WebsiteChatbot.
- We created a V1 bot, so fill out the variables for Lex V1 Lex V1 Bot Configuration Parameters. Set the BotName and BotAlias to your own bot name and alias that you noted down prior.

- Scroll down to WebAppConfBotInitialText to set the initial text that you want dispalyed on the website chatbot. Change the WebAppConfBotInitialSpeech to specify what you want the website to say if microphone is used.

- Change the WebAppConfToolbarTitle to specify what you want the toolbar on the website to say. Such as ‘Canteen Bot’.

- Agree to the terms and conditions and click
Create Stack.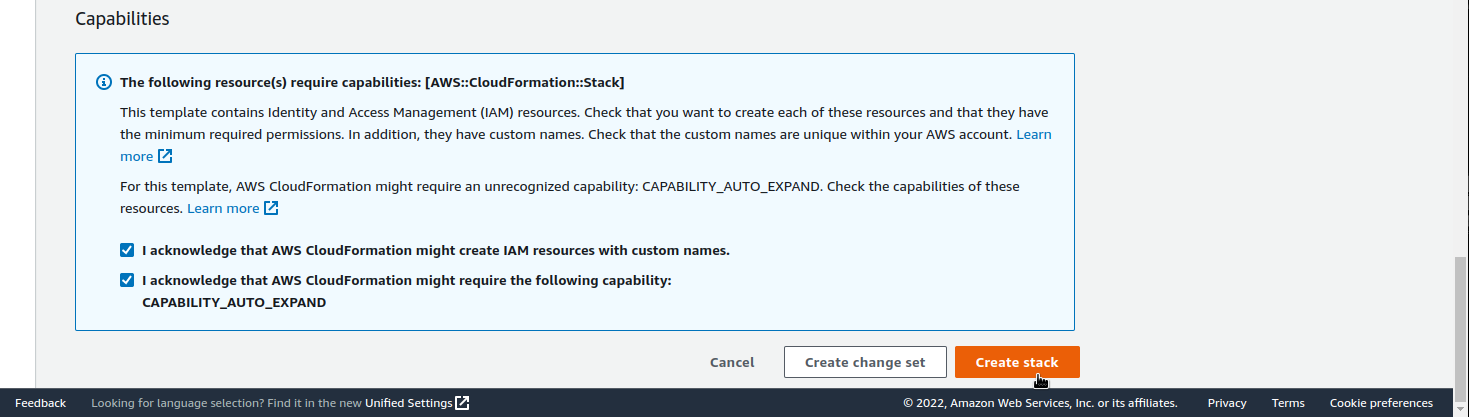
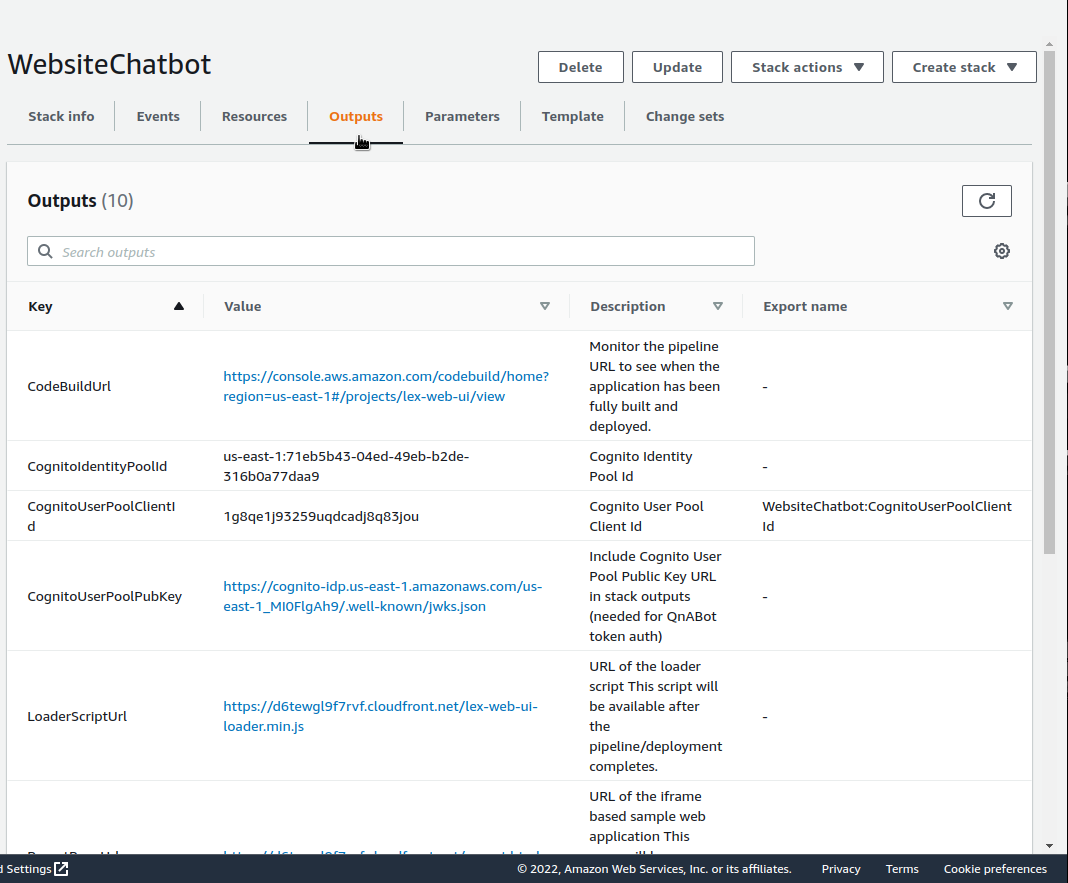
- Wait around 5-10 minutes for the website to deploy.
- Once the CloudFormation stack is complete as shown with the below screenshot, select the output tab to find your chatbot website URL. The link for your web application is found under the title WebAppUrl as seen below.
- Browse to the URL and you should see your website live like the below screenshot. You can experiment with the website like I’ve done.
Amazon Rekognition
We will test how AWS Rekognition undertakes image recognition using the AWS console. We will also set up Amazon Cognito Identity Pool so that we can log on to the website. Then, we will use a template to create a Rekognition demo on a live website. Finally, we will be use a template to add your chatbot into the live website. Let’s break it down one by one
Console Demo
- Once you have logged into the AWS Console, search for Amazon Rekognition and click on it.
- On the left, under the
Demos title, click onLabel Detection. You should see the below image recognition once you click on the link.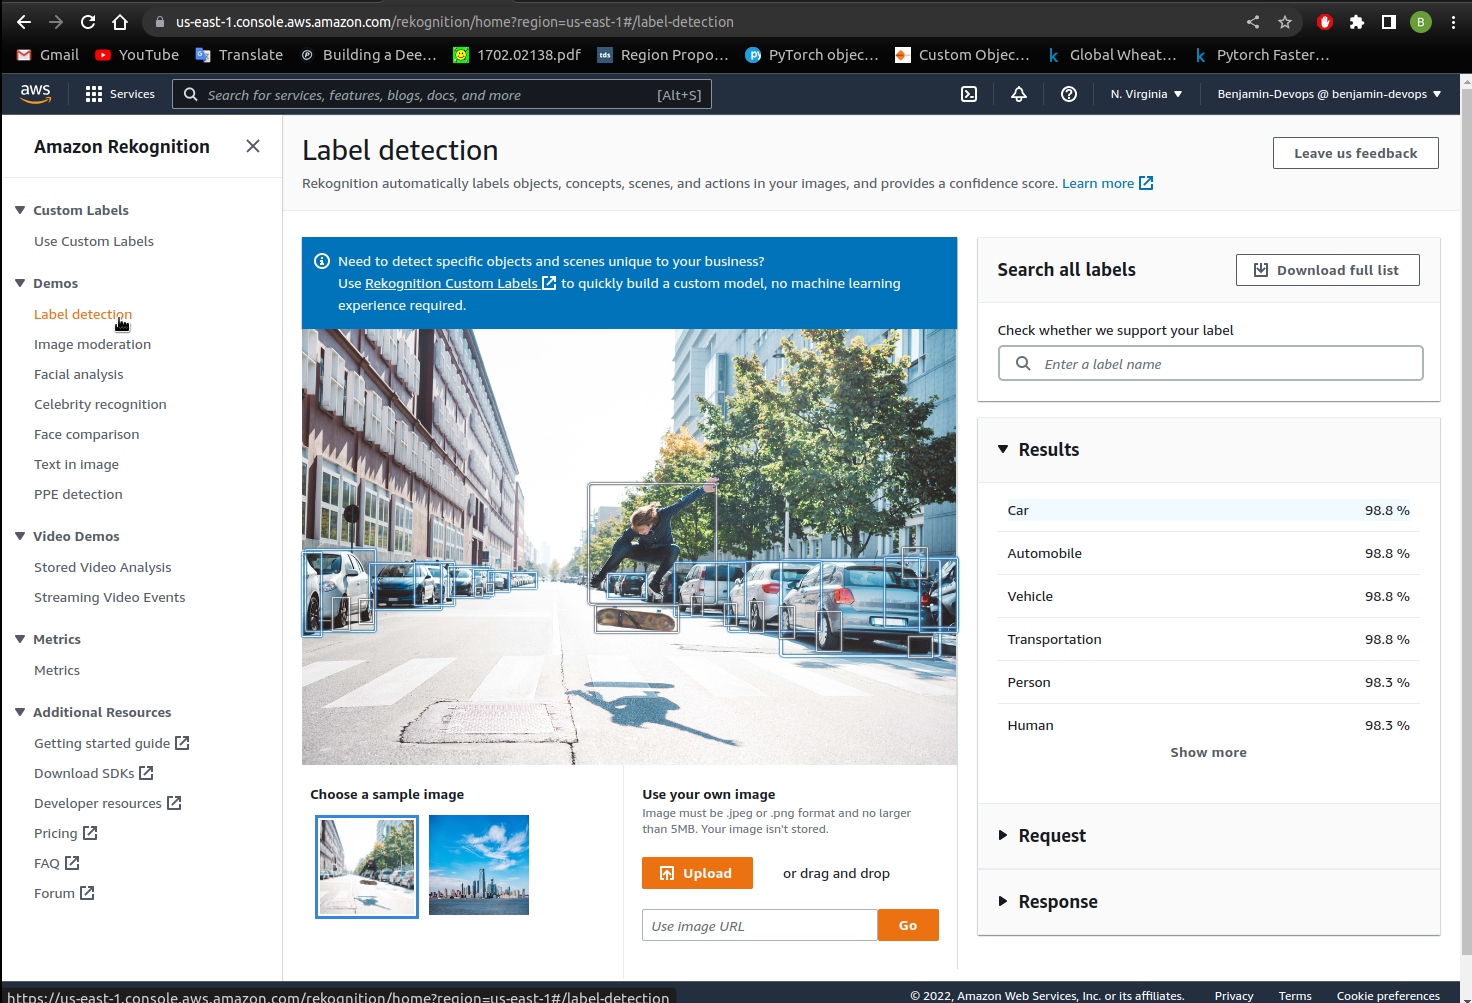
- Expand
RequestandResponseon the right hand side to see the general JSON format that Rekognition responds with.
- Click on the bottom
Uploadbutton at the bottom to upload your own image for Object and Scene Detection.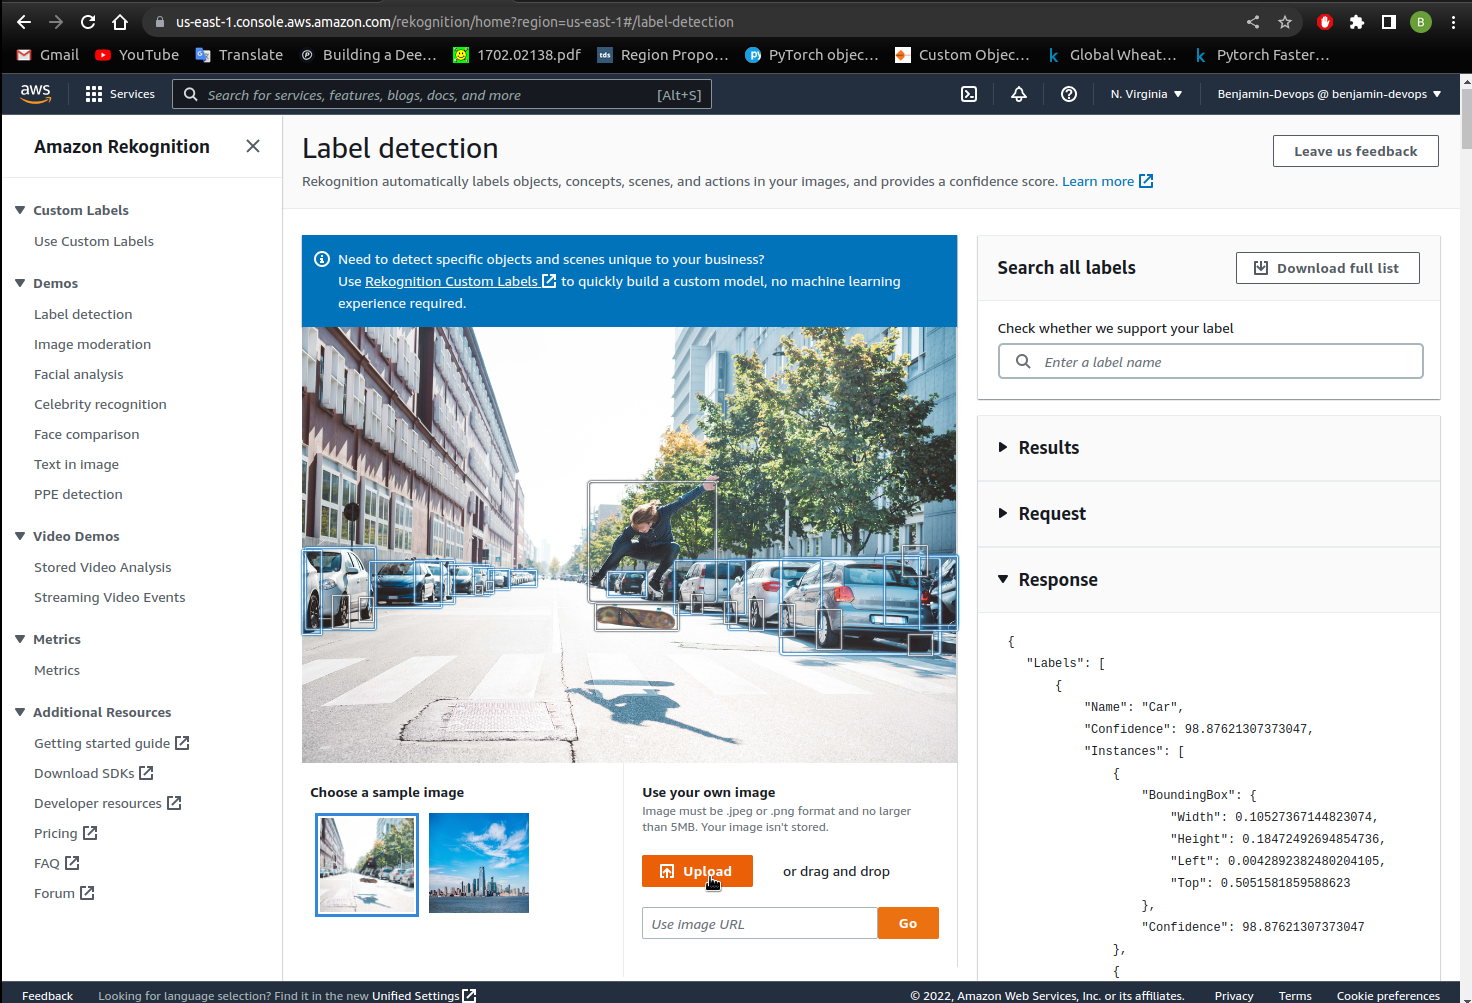
- Click on
Facial Analysison the left hand side and repeat steps 3 and 4. - Click on
Celebrity Recognitionon the left hand side and repeat steps 3 and 4. - Click on
Face Comparisonon the left hand side and repeat steps 3 and 4. - Click on
Text in imageon the left hand side and repeat steps 3 and 4.
This is just one way to use Rekognition. Next we will be embedding it into a website.
Amazon Cognito
Once you have finished testing the Rekognition demo. You can create an Amazon Cognito role for website integration. Amazon Cognito identity pools provide temporary AWS credentials for users who are guests (unauthenticated) and for users who have been authenticated and received a token. An identity pool is a store of user identity data specific to your account. Using identity pools, we will allow any users that access our website to utilise Amazon Rekognition and Amazon Lex.- From the AWS Console, type Cognito and click on it.
- Click on
Manage Identity Pools. - Click on
Create new identity pool. - Add an
identity pool name, tick theUnauthenticated Identitiesbox and clickCreate Pool.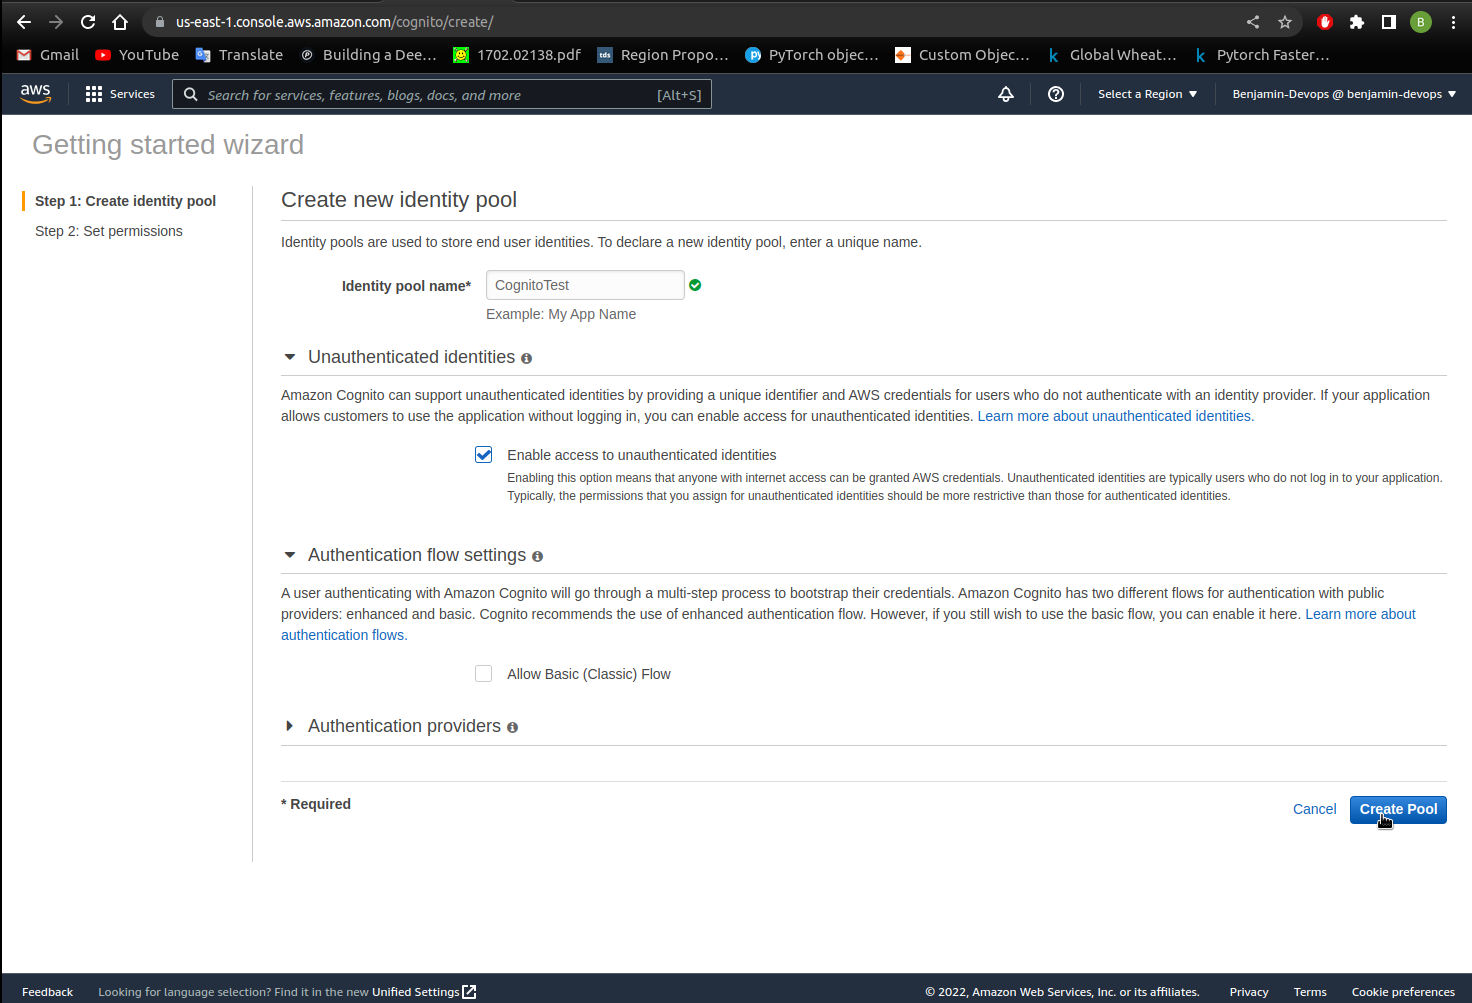
- Expand the
View Detailssection, note down the role name for authenticated and unauthenticated identities. ClickAllowwhen you’re done.
- On the new page, note down the Identity Pool ID, you will need this in the next section.
- On the services dropdown on the top, expand and search for
IAM. - On the IAM page, click on
Roleson the left hand side. - In the search bar, search for the unauthenticated role you noted down in Step 4 and click into it.
- Click
Attach Policiesto attach new policies for this role.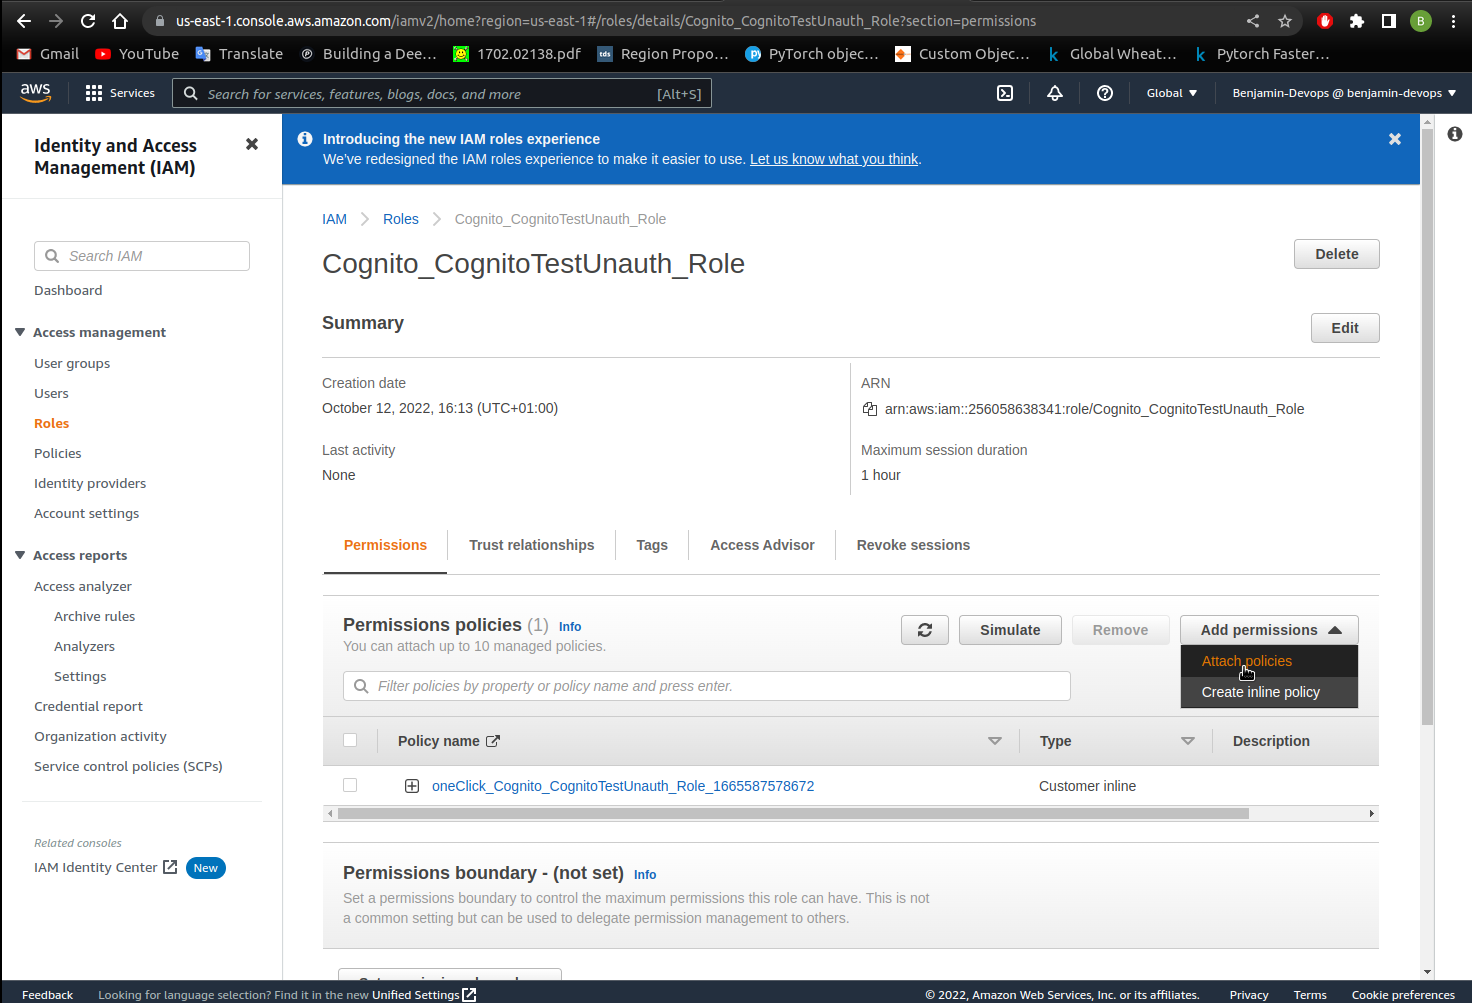
- Search for the AmazonLexRunBotsOnly and select the box on the left hand side.
- Search for AmazonRekognitionReadOnly policy, select the box on the left hand side.
- Once all the policies are selected, click
Attach Policyat the bottom.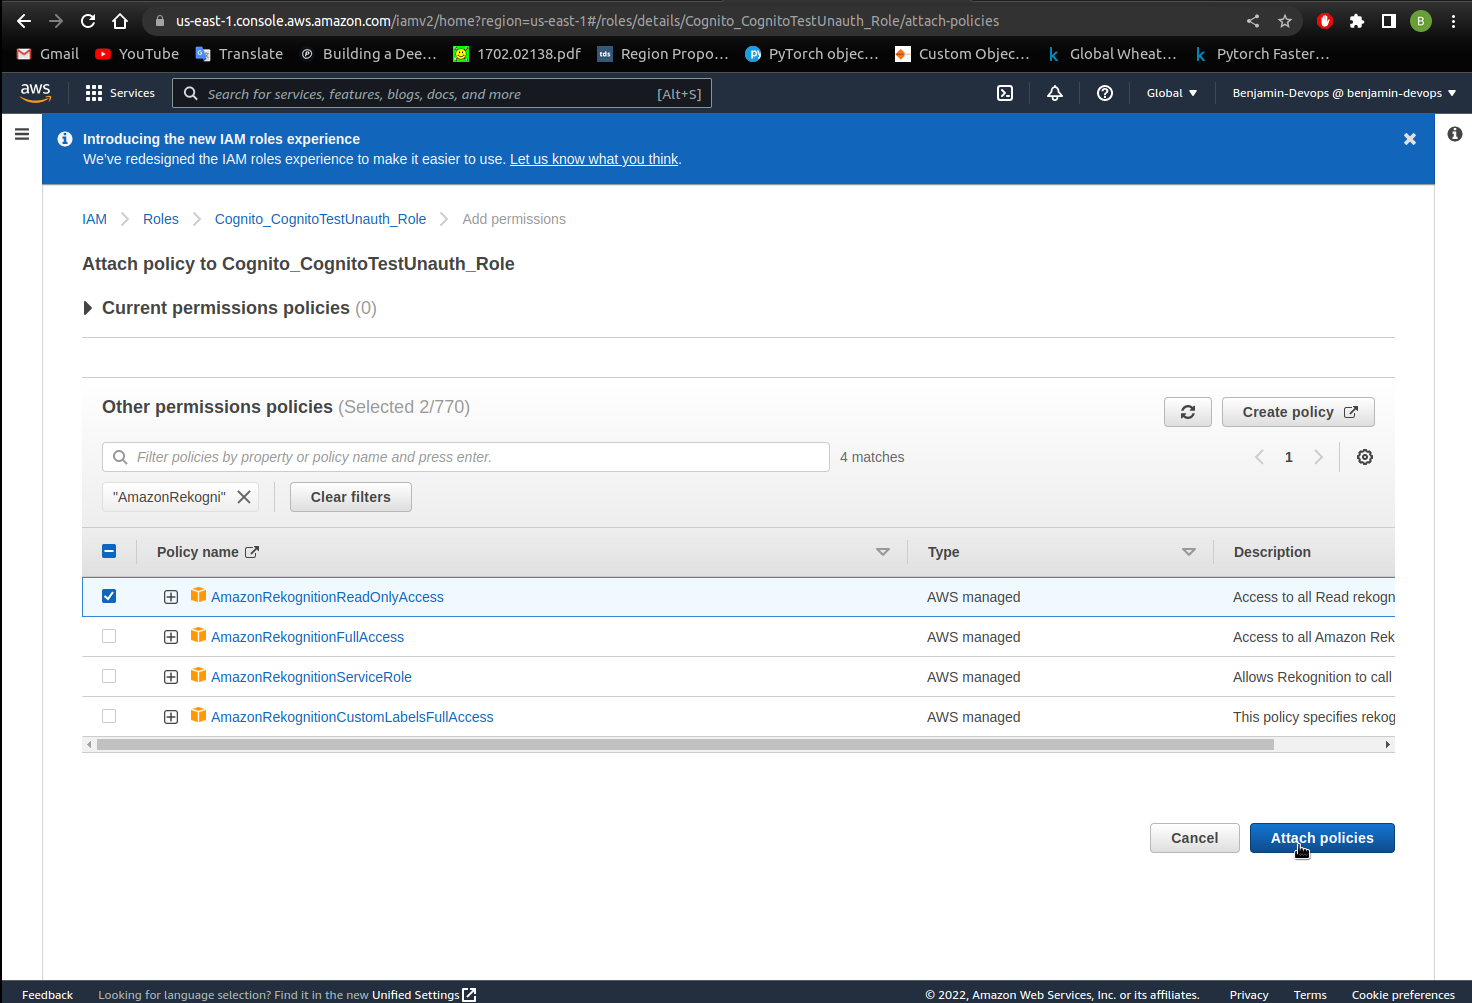
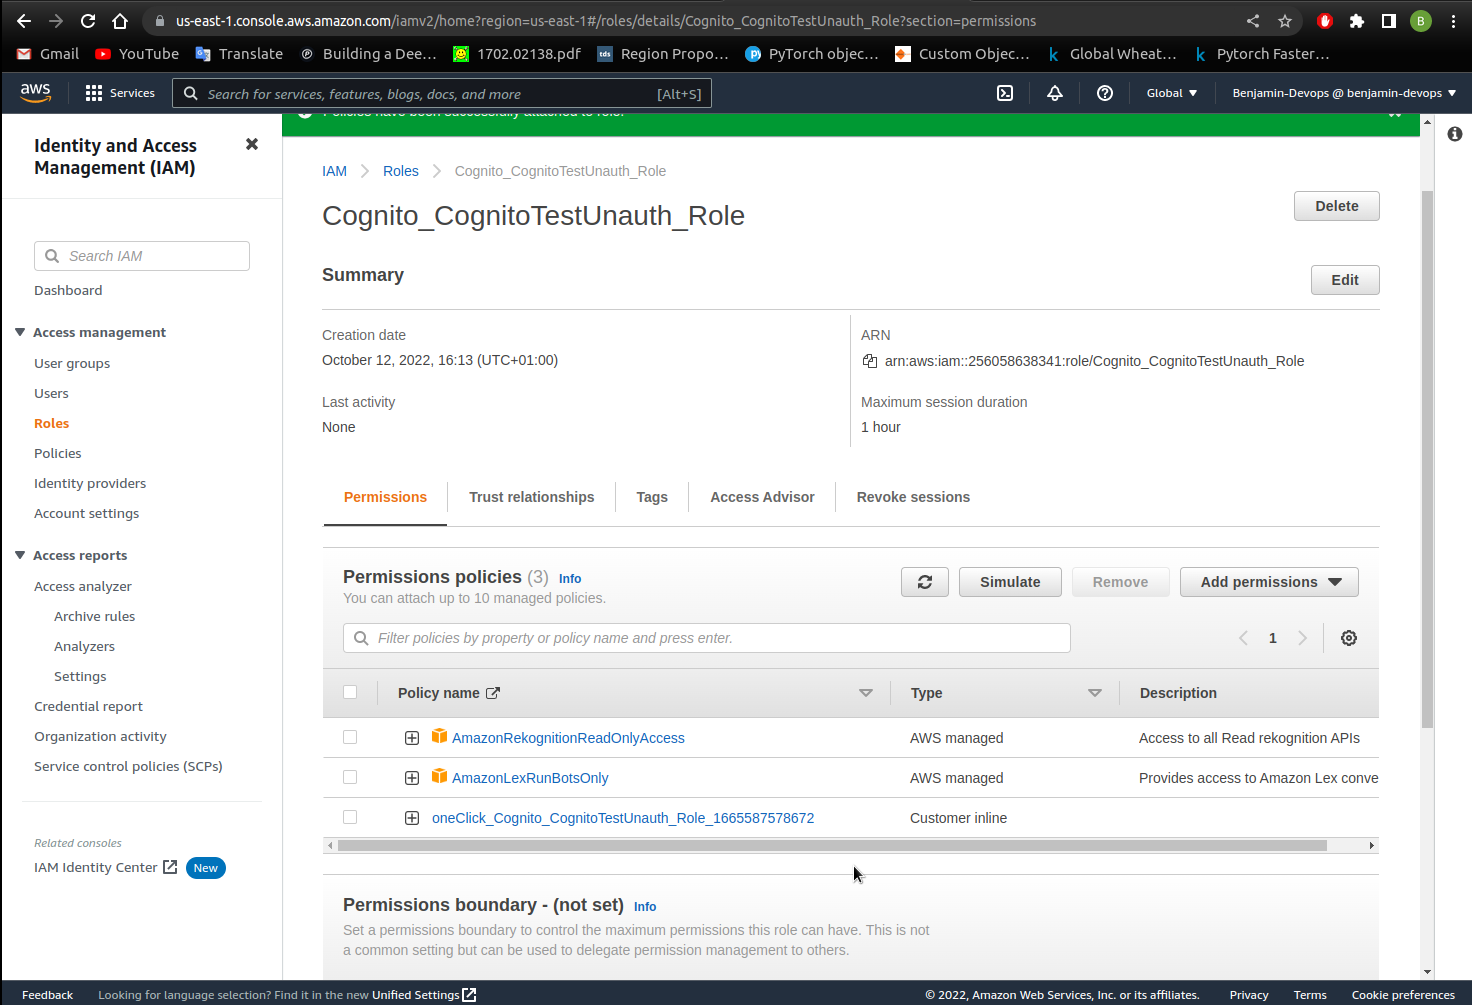
- You should now see the policies attached to your role.
This concludes the creation of Cognito Identities to use with the website
Rekognition Website Integration
This part is where our code editor comes in. We’ll create some files in the code editor that will be used to serve the Rekognition website.
- First open your code editor and create a file named
video.jsandmain.htmlunder the same directory. -
Paste the following template inside
main.html.This is a basic HTML file with the use of a Bootstrap framework to easily structure the webpage into 3 columns.<!DOCTYPE html> <html> <head> <meta charset="utf-8"> <meta name="viewport" content="width=device-width, initial-scale=1, shrink-to-fit=no"> <script src="https://sdk.amazonaws.com/js/aws-sdk-2.41.0.min.js"></script> <link rel="stylesheet" href="https://stackpath.bootstrapcdn.com/bootstrap/4.5.2/css/bootstrap.min.css" integrity="sha384-JcKb8q3iqJ61gNV9KGb8thSsNjpSL0n8PARn9HuZOnIxN0hoP+VmmDGMN5t9UJ0Z" crossorigin="anonymous"> <title>Amazon Rekognition and Lex Demo</title> </head> <body> <nav class="navbar navbar-light" style="background-color: #161E2D;"> <span class="navbar-brand mb-0 h1 " href="#" style="color:#FFFFFF;">Amazon Rekognition and Lex Demo</span> </nav> <br><br> <div class="container-fluid"> <div class="row"> <div id= "List" class="col-md-4 text-center"> <!--Insert code from Step 10 into this section--> </div> <div id="Camera Window" class="col-md-4 text-center"> <!--Insert code from Step 3 into this section--> </div> <div id="LexChatbot" class="col-md-4"> <!--Insert code from Amazon Lex Website Integration Step 1 into this section>--> </div> </div> </div> <script src="video.js"></script> </body> </html> <!--MIT No Attribution Copyright 2021 Amazon.com, Inc. or its affiliates. All Rights Reserved. Permission is hereby granted, free of charge, to any person obtaining a copy of this software and associated documentation files (the "Software"), to deal in the Software without restriction, including without limitation the rights to use, copy, modify, merge, publish, distribute, sublicense, and/or sell copies of the Software, and to permit persons to whom the Software is furnished to do so. THE SOFTWARE IS PROVIDED "AS IS", WITHOUT WARRANTY OF ANY KIND, EXPRESS OR IMPLIED, INCLUDING BUT NOT LIMITED TO THE WARRANTIES OF MERCHANTABILITY, FITNESS FOR A PARTICULAR PURPOSE AND NONINFRINGEMENT. IN NO EVENT SHALL THE AUTHORS OR COPYRIGHT HOLDERS BE LIABLE FOR ANY CLAIM, DAMAGES OR OTHER LIABILITY, WHETHER IN AN ACTION OF CONTRACT, TORT OR OTHERWISE, ARISING FROM, OUT OF OR IN CONNECTION WITH THE SOFTWARE OR THE USE OR OTHER DEALINGS IN THE SOFTWARE.--> -
Copy the below code within the body section inside the
main.htmlfile. Copy the code between the<div id="Camera Window" class="col-md-4 text-center">tag. This snippet of code creates a video element that can capture the video.<button type="button" id="switchButton" style="background-color:#FF9900; display:none; color:#000000" class="btn">Switch Camera</button> <br><br> <canvas class="img-fluid" id="canvas" width=320 height=240></canvas> <video class="img-fluid" autoplay="true" id="videoElement"></video> <br><br> <button type="button" id="capture" style="background-color:#FF9900; color:#000000" class="btn"> <svg width="2em" height="2em" viewBox="0 0 16 16" class="bi bi-camera" fill="currentColor" xmlns="http://www.w3.org/2000/svg"> <path fill-rule="evenodd" d="M15 12V6a1 1 0 0 0-1-1h-1.172a3 3 0 0 1-2.12-.879l-.83-.828A1 1 0 0 0 9.173 3H6.828a1 1 0 0 0-.707.293l-.828.828A3 3 0 0 1 3.172 5H2a1 1 0 0 0-1 1v6a1 1 0 0 0 1 1h12a1 1 0 0 0 1-1zM2 4a2 2 0 0 0-2 2v6a2 2 0 0 0 2 2h12a2 2 0 0 0 2-2V6a2 2 0 0 0-2-2h-1.172a2 2 0 0 1-1.414-.586l-.828-.828A2 2 0 0 0 9.172 2H6.828a2 2 0 0 0-1.414.586l-.828.828A2 2 0 0 1 3.172 4H2z"/> <path fill-rule="evenodd" d="M8 11a2.5 2.5 0 1 0 0-5 2.5 2.5 0 0 0 0 5zm0 1a3.5 3.5 0 1 0 0-7 3.5 3.5 0 0 0 0 7z"/> <path d="M3 6.5a.5.5 0 1 1-1 0 .5.5 0 0 1 1 0z"/> </svg> Capture <span id="spinner" style="display: none" class="spinner-border spinner-border-sm" role="status" aria-hidden="true"></span> </button> <br><br> -
We want to make sure that the image displays, to do this we want to add some code inside
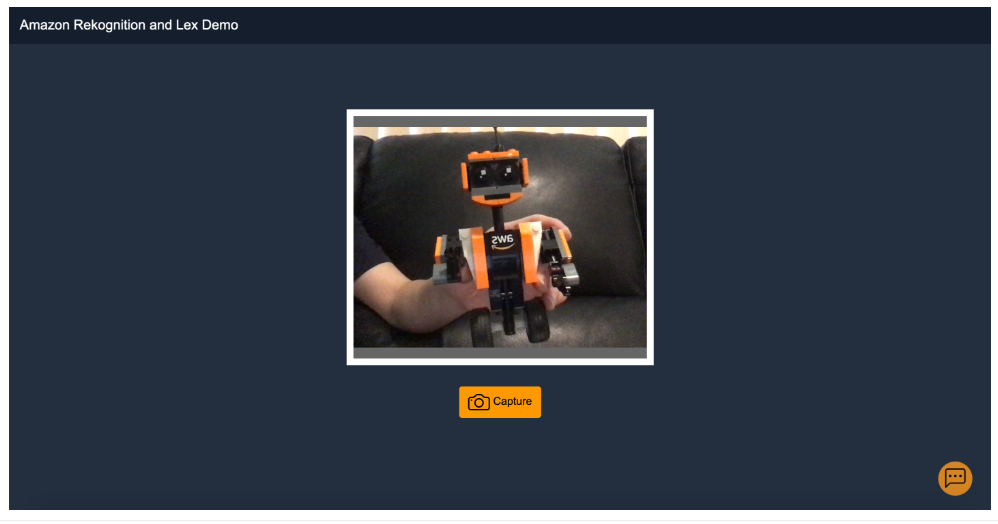
video.js. Copy the below code into yourvideo.jsfile and save it.This code will initiate the camera window so you can capture images from your laptop camera.//Controls the video element var video = document.querySelector("#videoElement"); const canvas = document.getElementById('canvas'); const context = canvas.getContext('2d'); const switchButton = document.getElementById("switchButton") const chatbotButton = document.getElementById("chatbotButton") const spinnerIcon = document.getElementById("spinner") //Flips the camera window video.setAttribute("style", 'transform\:scaleX(-1);') context.translate(320, 0); context.scale(-1, 1); //Creates the capture button const captureButton = document.getElementById('capture'); // Hide the canvas canvas.style.display="none"; //Used to detect the amount of cameras on the device accessing the page and add the switch button. function gotDevices(mediaDevices) { let count = 0; mediaDevices.forEach(mediaDevice => { if (mediaDevice.kind === 'videoinput') { count++; } }); if(count>1){ switchButton.style.display= "inline-block"; } } //Displays the switch camera button if there is more than 1 device. navigator.mediaDevices.enumerateDevices().then(gotDevices); //Defines default as the camera facing the user. var videoConstraints = { facingMode: 'user' }; var constraints = { video: videoConstraints, audio: false }; //Get Initial Camera Feed getCameraFeed(constraints) //Event when the switch button is clicked. switchButton.addEventListener('click', event => { if (videoConstraints.facingMode == 'user'){ video.setAttribute("style", 'transform\:scaleX(1);') videoConstraints.facingMode = 'environment'; }else{ video.setAttribute("style", 'transform\:scaleX(-1);') videoConstraints.facingMode = 'user'; } constraints = { video: videoConstraints, audio: false }; getCameraFeed(constraints) }); //Getting the camera stream. function getCameraFeed(constraints){ //Gets the camera video if (navigator.mediaDevices.getUserMedia) { navigator.mediaDevices.getUserMedia(constraints) .then(function (stream) { video.srcObject = stream; }) .catch(function (err0r) { console.log("Something went wrong!"); }); } } - Double click on your main.html file in your file director and when the browser asks for camera permissions, click Allow. You should now be able to see a screen with the capture button applied in the middle of the page.
-
Let’s change the background color for the webpage. Create a file called
style.cssand paste the below code inside.This sets the background to a particular colour, you can change the hex colour code and experiment with background colors.body {background-color: #232F3E;} /*MIT No Attribution Copyright 2021 Amazon.com, Inc. or its affiliates. All Rights Reserved. Permission is hereby granted, free of charge, to any person obtaining a copy of this software and associated documentation files (the "Software"), to deal in the Software without restriction, including without limitation the rights to use, copy, modify, merge, publish, distribute, sublicense, and/or sell copies of the Software, and to permit persons to whom the Software is furnished to do so. THE SOFTWARE IS PROVIDED "AS IS", WITHOUT WARRANTY OF ANY KIND, EXPRESS OR IMPLIED, INCLUDING BUT NOT LIMITED TO THE WARRANTIES OF MERCHANTABILITY, FITNESS FOR A PARTICULAR PURPOSE AND NONINFRINGEMENT. IN NO EVENT SHALL THE AUTHORS OR COPYRIGHT HOLDERS BE LIABLE FOR ANY CLAIM, DAMAGES OR OTHER LIABILITY, WHETHER IN AN ACTION OF CONTRACT, TORT OR OTHERWISE, ARISING FROM, OUT OF OR IN CONNECTION WITH THE SOFTWARE OR THE USE OR OTHER DEALINGS IN THE SOFTWARE.*/ -
Add the below code snippet to the headsection within the
main.htmlfile. This ensures that your HTML file can have a reference to the style you defined within your css document.<link rel="stylesheet" href = "style.css"> -
Your head section within your
main.htmlfile should look like the code snippet below.<head> <meta charset="utf-8"> <meta name="viewport" content="width=device-width, initial-scale=1, shrink-to-fit=no"> <script src="https://sdk.amazonaws.com/js/aws-sdk-2.41.0.min.js"></script> <link rel="stylesheet" href="https://stackpath.bootstrapcdn.com/bootstrap/4.5.2/css/bootstrap.min.css" integrity="sha384-JcKb8q3iqJ61gNV9KGb8thSsNjpSL0n8PARn9HuZOnIxN0hoP+VmmDGMN5t9UJ0Z" crossorigin="anonymous"> <link rel="stylesheet" href = "style.css"> <title>Amazon Rekognition and Lex Demo</title> </head> - Refresh your webpage and your background colour accordingly.
-
We also want to identify the items found in the image. Copy and paste the below code within the body section of the
main.htmlfile after the<div id= "List" class="col-md-4 text-center">tag. Comments in the file will indicate the location. This code will show a list of item results once the Rekognition API is integrated.<div id="ImageResults"> <h2 id= "ElementsFoundHeading" style="color:#FFFFFF; visibility:hidden; align-content: left"> Image Elements Recognised</h2> <ul class="list-unstyled"id="ResultsList" style="color:#FFFFFF"> </ul> </div> -
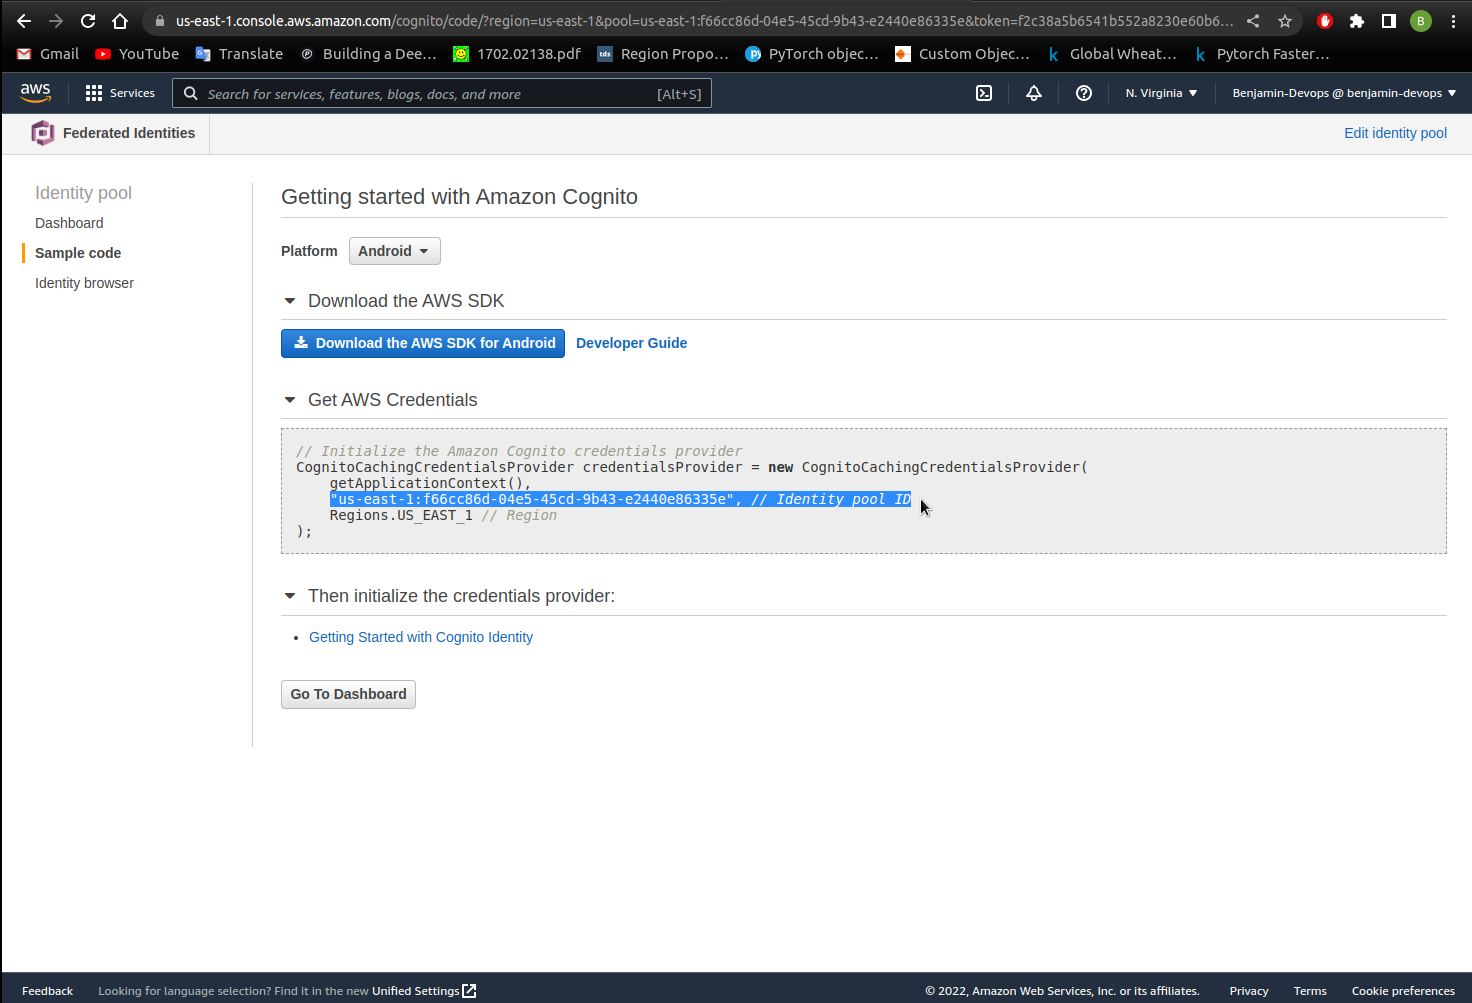
Now we want to send the image bytes over to the Rekognition API to identify the objects in the image. To undertake this, copy and paste the function below to the bottom of the
video.jsfile. Replace the identity pool id with the identity pool id you copied down in the previous section and the check that the region matches that of the one you are using.//Initialize the Amazon Cognito credentials provider AWS.config.region = 'ap-southeast-2'; // Region AWS.config.credentials = new AWS.CognitoIdentityCredentials({ // Provide your Pool Id here IdentityPoolId: 'YOUR_IDENTITY_POOL_ID', }); //Used to convert image to bytes function getBinary(base64Image) { var binaryImg = atob(base64Image); var length = binaryImg.length; var ab = new ArrayBuffer(length); var ua = new Uint8Array(ab); for (var i = 0; i < length; i++) { ua[i] = binaryImg.charCodeAt(i); } return ab; } //Initialises Rekognition. var rekognition = new AWS.Rekognition(); //When the capture button is clicked, captures the image as bytes and sends to Rekognition to analyse the images. captureButton.addEventListener('click', () => { // Draw the video frame to the canvas. spinnerIcon.style.display ="inline-block"; context.drawImage(video, 0, 0, canvas.width, canvas.height); var img = canvas.toDataURL("image/png"); var base64Image = img.replace(/^data\:image\/(png|jpeg|jpg);base64,/, ''); var imageBytes = getBinary(base64Image); IdentifyObject(imageBytes) }); //Calls the Rekognition API to recognise objects function IdentifyObject(bytes){ var params = { Image: { /* required */ Bytes: bytes /* Strings will be Base-64 encoded on your behalf */, }, MaxLabels: 5, MinConfidence: 70 }; //DetectLabels API called to recognise the image bytes. rekognition.detectLabels(params, function(err, data) { if (err) console.log(err, err.stack); // an error occurred else console.log(data); pageList = document.getElementById("ResultsList") document.getElementById("ElementsFoundHeading").style.visibility = "visible"; //Removes list on the left hand side. removeAllChildNodes(pageList) var executeSearch = 0; //Adds a list of items detected. for( var i = 0; i < data.Labels.length; i++){ var element = document.createElement("LI"); element.innerHTML = data.Labels[i].Name + " - " + (data.Labels[i].Confidence).toFixed(2) + "%"; pageList.appendChild(element) } spinnerIcon.style.display = "none"; }); } //Clear list of images detected everytime there is a captured image function removeAllChildNodes(parent) { while (parent.firstChild) { parent.removeChild(parent.firstChild); } } /*MIT No Attribution Copyright 2021 Amazon.com, Inc. or its affiliates. All Rights Reserved. Permission is hereby granted, free of charge, to any person obtaining a copy of this software and associated documentation files (the "Software"), to deal in the Software without restriction, including without limitation the rights to use, copy, modify, merge, publish, distribute, sublicense, and/or sell copies of the Software, and to permit persons to whom the Software is furnished to do so. THE SOFTWARE IS PROVIDED "AS IS", WITHOUT WARRANTY OF ANY KIND, EXPRESS OR IMPLIED, INCLUDING BUT NOT LIMITED TO THE WARRANTIES OF MERCHANTABILITY, FITNESS FOR A PARTICULAR PURPOSE AND NONINFRINGEMENT. IN NO EVENT SHALL THE AUTHORS OR COPYRIGHT HOLDERS BE LIABLE FOR ANY CLAIM, DAMAGES OR OTHER LIABILITY, WHETHER IN AN ACTION OF CONTRACT, TORT OR OTHERWISE, ARISING FROM, OUT OF OR IN CONNECTION WITH THE SOFTWARE OR THE USE OR OTHER DEALINGS IN THE SOFTWARE.*/ - After adding all those components, save the file and refresh your web page. When you click capture, the Rekognition API would be used to identify the objects and you should see a list of objects on the left hand side. Additionally, a spinning icon should come up when capturing images.
-
We can add some custom functionality such as Google searching any objects identified. Add the below code snippet inside
video.jsafterpageList.appendChild(element).//If labels are not face, person or human and it's the first time search is occurring, search for the detected object in Google. if((data.Labels[i].Name !== "Face") && (data.Labels[i].Name !== "Person") && (data.Labels[i].Name !== "Human") && executeSearch == 0){ URL = "https://www.google.com/search?q=" + data.Labels[i].Name window.open(URL, '_blank'); executeSearch = 1; } -
Your code should look like this for
video.js.for(var i = 0; i < data.Labels.length; i++){ var element = document.createElement("LI"); element.innerHTML = data.Labels[i].Name + " - " + (data.Labels[i].Confidence).toFixed(2) + "%"; pageList.appendChild(element) //If labels are not face, person or human and it's the first time search is occurring, search for the detected object in Google. if((data.Labels[i].Name !== "Face") && (data.Labels[i].Name !== "Person") && (data.Labels[i].Name !== "Human") && executeSearch == 0){ URL = "https://www.google.com/search?q=" + data.Labels[i].Name window.open(URL, '_blank'); executeSearch = 1; } } - Refresh your page and test out the image recognition website by taking a picture and see the google search occur for the item in the image.
-
Let’s add some extra styles in the webpage. Add the below css inside your
style.cssfile. This adds the borders and background colours for the video window.#videoElement { width: 500px; height: 375px; background-color: #666; border: 10px #FFFFFF solid; }This somes up how we use Amazon Rekognition within our website
Amazon Lex Website Integration
Once you have finished creating your website with Rekognition, let’s add a chatbot into it.
- Open your
main.htmland paste the code in the<div id="LexChatbot" class="col-md-4"></div>tags.
This code includes a button on the bottom right corner and will open a form when the button is clicked.
<button type="button" class="btn open-button btn-circle btn-md"  style="background-color:#FF9900; color:#000000; visibility: visible;"  onclick="openForm()">
    <svg width="3em" height="3em" viewBox="0 0 16 16" class="bi bi-chat-left-dots" fill="currentColor" xmlns="http://www.w3.org/2000/svg">
        <path fill-rule="evenodd" d="M14 1H2a1 1 0 0 0-1 1v11.586l2-2A2 2 0 0 1 4.414 11H14a1 1 0 0 0 1-1V2a1 1 0 0 0-1-1zM2 0a2 2 0 0 0-2 2v12.793a.5.5 0 0 0 .854.353l2.853-2.853A1 1 0 0 1 4.414 12H14a2 2 0 0 0 2-2V2a2 2 0 0 0-2-2H2z"/>
        <path d="M5 6a1 1 0 1 1-2 0 1 1 0 0 1 2 0zm4 0a1 1 0 1 1-2 0 1 1 0 0 1 2 0zm4 0a1 1 0 1 1-2 0 1 1 0 0 1 2 0z"/>
    </svg>
    </button>

    <div class="chat-popup" id="myForm">

        <form id="chatform" class="form-container">
        <div id="conversation" style="max-width: 300px; padding: 10px; height: 350px; border: 1px solid #ccc; background-color: #eee; padding: 4px; overflow: scroll"></div>
        <br>
        <input type="text" id="wisdom" size="80" value="" style="max-width: 280px; padding: 10px;"" placeholder="I want a drink...">
        <br><br>
        <button type="submit" class="btn" onclick= "return pushChat();">Send</button>
        <button type="button" class="btn cancel" onclick="closeForm()">Close</button>
        </form>

</div>-
Paste the below code inside the
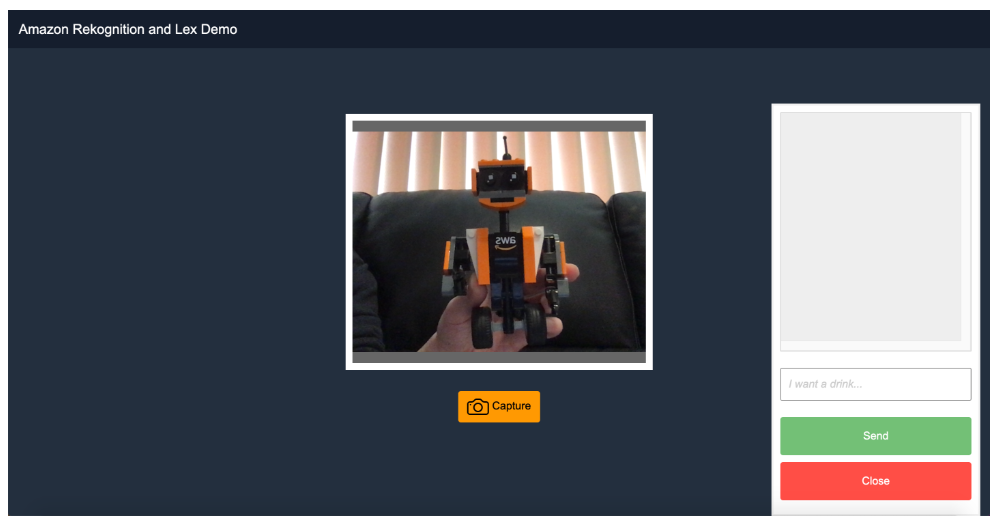
style.cssbefore the copyright statment so the form and buttons are styled correctly.input#wisdom { padding: 1px; font-size: 1em; width: 300px } input::placeholder { color: #ccc; font-style: italic; } p.userRequest { margin: 4px; padding: 4px 10px 4px 10px; border-radius: 4px; min-width: 50%; max-width: 85%; float: left; background-color: #7d7; } p.lexResponse { margin: 4px; padding: 4px 10px 4px 10px; border-radius: 4px; text-align: right; min-width: 50%; max-width: 85%; float: right; background-color: #bbf; font-style: italic; } p.lexError { margin: 4px; padding: 4px 10px 4px 10px; border-radius: 4px; text-align: right; min-width: 50%; max-width: 85%; float: right; background-color: #f77; } body {font-family: Arial, Helvetica, sans-serif;} /* Button used to open the chat form - fixed at the bottom of the page */ .open-button { background-color: #555; color: white; padding: 16px 20px; border: none; cursor: pointer; opacity: 0.8; position: fixed; bottom: 23px; right: 28px; width: 280px; } /* Circle button CSS */ .btn-circle.btn-md { width: 50px; height: 50px; padding: 7px 10px; border-radius: 25px; font-size: 10px; text-align: center; } /* The popup chat - hidden by default */ .chat-popup { display: none; position: fixed; bottom: 0; right: 15px; border: 3px solid #f1f1f1; z-index: 9; } /* Add styles to the form container */ .form-container { max-width: 300px; padding: 10px; background-color: white; } /* Full-width textarea */ .form-container textarea { width: 100%; padding: 15px; margin: 5px 0 22px 0; border: none; background: #f1f1f1; resize: none; min-height: 200px; } /* When the textarea gets focus, do something */ .form-container textarea\:focus { background-color: #ddd; outline: none; } /* Set a style for the submit/send button */ .form-container .btn { background-color: #4CAF50; color: white; padding: 16px 20px; border: none; cursor: pointer; width: 100%; margin-bottom:10px; opacity: 0.8; } /* Add a red background color to the cancel button */ .form-container .cancel { background-color: red; } /* Add some hover effects to buttons */ .form-container .btn\:hover, .open-button\:hover { opacity: 1; } - The webpage should look like the below now. The orange button on the right hand side should be seen now but you can’t interact with it at this point in time.
-
To link the Lex chatbot functionality with the website, first create a new file in the same directory called
chatbot.js. Paste the following code in that file.// Sets the focus to the input box document.getElementById("wisdom").focus(); //Open the Lex PopUp function openForm() { document.getElementById("myForm").style.display = "block"; } //Closes The Lex PopUp function closeForm() { document.getElementById("myForm").style.display = "none"; } //Integrate with Amazon Lex var lexruntime = new AWS.LexRuntime(); var lexUserId = 'chatbot-demo' + Date.now(); var sessionAttributes = {}; function pushChat() { // if there is text to be sent... var wisdomText = document.getElementById('wisdom'); if (wisdomText && wisdomText.value && wisdomText.value.trim().length > 0) { // disable input to show we're sending it var wisdom = wisdomText.value.trim(); wisdomText.value = '...'; wisdomText.locked = true; // send it to the Lex runtime var params = { botAlias: 'Insert Bot Alias Here', botName: 'Insert Bot Name', inputText: wisdom, userId: lexUserId, sessionAttributes: sessionAttributes }; showRequest(wisdom); lexruntime.postText(params, function(err, data) { if (err) { console.log(err, err.stack); showError('Error: ' + err.message + ' (see console for details)') } if (data) { // capture the sessionAttributes for the next cycle sessionAttributes = data.sessionAttributes; // show response and/or error/dialog status showResponse(data); } // re-enable input wisdomText.value = ''; wisdomText.locked = false; }); } // we always cancel form submission return false; } function showRequest(daText) { var conversationDiv = document.getElementById('conversation'); var requestPara = document.createElement("P"); requestPara.className = 'userRequest'; requestPara.appendChild(document.createTextNode(daText)); conversationDiv.appendChild(requestPara); conversationDiv.scrollTop = conversationDiv.scrollHeight; } function showError(daText) { var conversationDiv = document.getElementById('conversation'); var errorPara = document.createElement("P"); errorPara.className = 'lexError'; errorPara.appendChild(document.createTextNode(daText)); conversationDiv.appendChild(errorPara); conversationDiv.scrollTop = conversationDiv.scrollHeight; } function showResponse(lexResponse) { var conversationDiv = document.getElementById('conversation'); var responsePara = document.createElement("P"); responsePara.className = 'lexResponse'; if (lexResponse.message) { responsePara.appendChild(document.createTextNode(lexResponse.message)); responsePara.appendChild(document.createElement('br')); } if (lexResponse.dialogState === 'ReadyForFulfillment') { responsePara.appendChild(document.createTextNode( 'Ready for fulfillment')); } else { responsePara.appendChild(document.createTextNode( '(' + lexResponse.dialogState + ')')); } conversationDiv.appendChild(responsePara); conversationDiv.scrollTop = conversationDiv.scrollHeight; } /*MIT No Attribution Copyright 2021 Amazon.com, Inc. or its affiliates. All Rights Reserved. Permission is hereby granted, free of charge, to any person obtaining a copy of this software and associated documentation files (the "Software"), to deal in the Software without restriction, including without limitation the rights to use, copy, modify, merge, publish, distribute, sublicense, and/or sell copies of the Software, and to permit persons to whom the Software is furnished to do so. THE SOFTWARE IS PROVIDED "AS IS", WITHOUT WARRANTY OF ANY KIND, EXPRESS OR IMPLIED, INCLUDING BUT NOT LIMITED TO THE WARRANTIES OF MERCHANTABILITY, FITNESS FOR A PARTICULAR PURPOSE AND NONINFRINGEMENT. IN NO EVENT SHALL THE AUTHORS OR COPYRIGHT HOLDERS BE LIABLE FOR ANY CLAIM, DAMAGES OR OTHER LIABILITY, WHETHER IN AN ACTION OF CONTRACT, TORT OR OTHERWISE, ARISING FROM, OUT OF OR IN CONNECTION WITH THE SOFTWARE OR THE USE OR OTHER DEALINGS IN THE SOFTWARE.*/ - Replace the botName and botAlias in the code from step 4 on lines 32 and 33 with the corresponding Lex Bot name and alias for your Amazon Lex chatbot.
-
Add the below code snippet underneath
<script src="video.js"></script>within themain.htmlfile.<script src="chatbot.js"></script> - You should now be able to expand the chatbot window and interact with your Amazon Lex Chatbot.
This should integrate the chatbot on the website
Website Hosting
Whew! Don't give up!! We're almost there. We've been able to integrate the chatbot and recognition app on the website. However, this has been done locally. Let's try and host the website on Amazon S3 using Cloudfront CDN.Website Hosting
We can place the files on Amazon S3 (Simple Storage Service) and use Amazon CloudFront (content delivery network) to distribute the website. The use of Amazon CloudFront (content delivery network) is to cache website static content closer to the user that accessed the website so loading time are faster. In addition to speed, we are using Amazon CloudFront so we can attach a certificate to it, enabling secure communication on the web using HTTPS. This also means we can access the cameras on our devices using this website.- Let’s navigate to the AWS Console and type Amazon S3 in the search bar to go to the Amazon S3 console.
- Once inside the Amazon S3 console, create a new bucket by clicking
Create Bucket. - Give a unique name to the bucket and click
Create bucketon the bottom right corner. - Find your bucket name and click on the name to enter your bucket.
- Drag your
main.html,style.css,chatbot.jsandvideo.jsfiles into the bucket and then click upload. - Go to the services bar on the top left and type
Amazon CloudFrontto go to the Amazon CloudFront service console. - Click
Create Distributionon the top left within the service panel. - Within the next page, select your bucket created earlier for the
origin domain name. This tells Amazon CloudFront which bucket to get your html file. SetYes use OAI. This prevents bucket from being accessed publicly which is the best practice. SetOrigin Access Identity as Create a New OAI. This allocates an identity to the Amazon CloudFront distribution and is used to access the buckets. SetBucket Policy as Yes, update the bucket policy. Allows the origin access identity to access the bucket contents.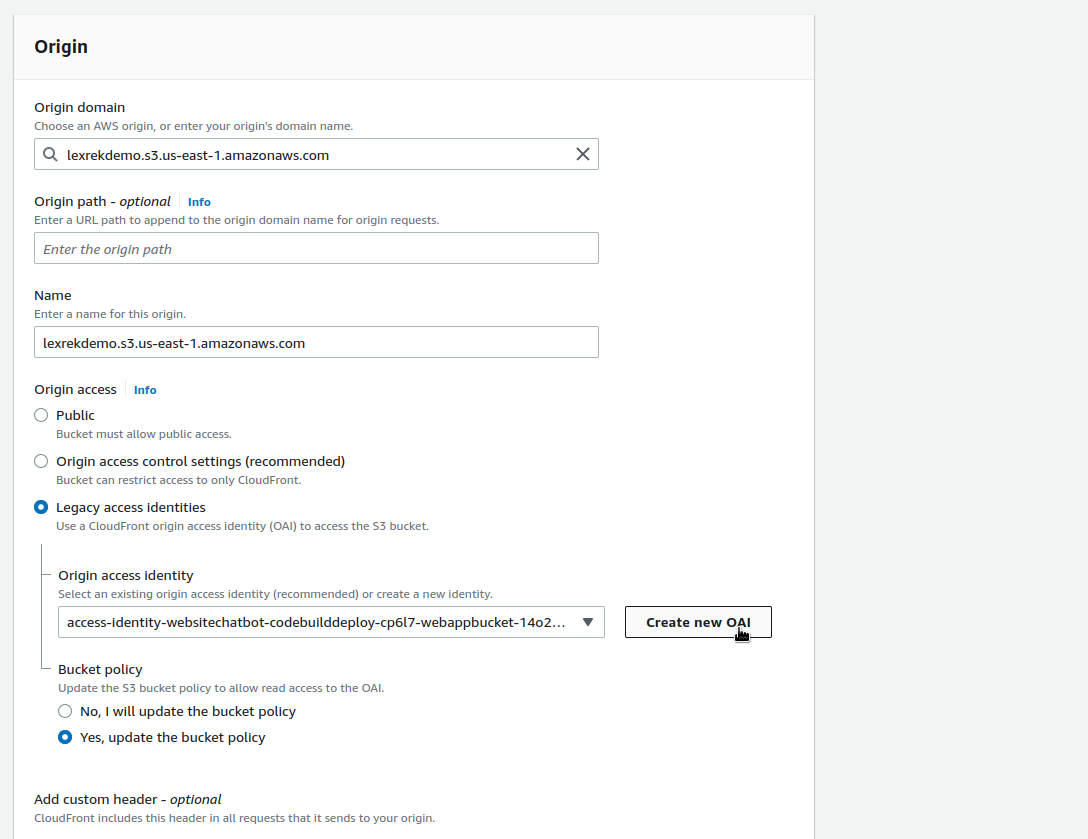
- Set the
Viewer Protocol Policy as Redirect HTTP to HTTPS. There needs to be HTTPS set to access your camera on the device.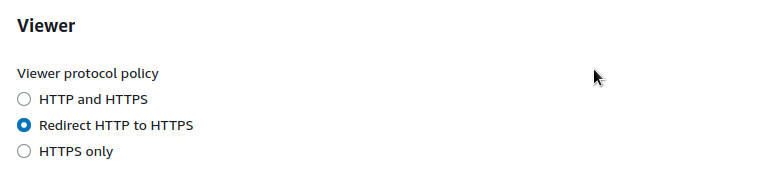
- Set the
Default Root Objectasmain.html.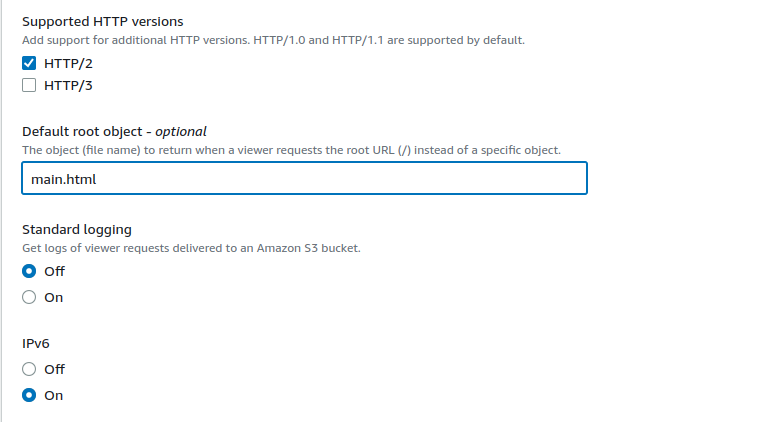
- Click
Create Distributionon the bottom right to create your distribution and wait 10-15 minutes. - Click
Distributionson the left hand side and go to your distribution Domain Name. Copy and paste that name to your web browser to see your website. Allow it to access your camera. - Try accessing the website on your phone and you should be able to use both cameras to undertake image recognition.
That sums everything up!! Here is a summary of everything we did:
- Built a chatbot with basic interactions using Amazon Lex console
- Used Lambda to respond to the user interactions
- Explored the Amazon Lex console to add buttons to the responses of the question
- Launched the chatbot on a website using an already existing cloudformation template
- Tested how Amazon Rekognition undertakes image recognition using the AWS console
- Used a template to create a Rekognition demo on a live website
- Used a template to add the chatbot into the live website
- Hosted the website on S3 using Cloudfront CDN
Cleanup
Removing the Lex Chatbot
- Navigate to the Amazon Lex console by searching for this service.
- (If you have published your chatbot) Go to your chatbot, select settings and delete the alias.
- Click on the blue arrow on the top left next to CanteenBot to go back to the main page.
- Select your chatbot, click ‘Actions’ and ‘Delete’ to remove your chatbot.
- Select the intents link on the left hand side, select the ‘OrderDrink’ intent and using the actions dropdown box, you can delete your intent.
- Select the ‘Slot types’ link on the left hand side, select all the slot types you created (FlavourType, SizeType, DrinkType) and using the actions dropdown box, you can delete your slot types.
Removing Lambda Function
- Go to the Lambda console.
- Select the ‘CanteenBot’ Lambda function, click on the ‘Actions’ button on the top right and click on ‘Delete’.
Removing CloudFormation
This is only applicable if you have created the website using CloudFormation in the Additional Features Section.- Navigate to the CloudFormation console.
- Select your CloudFormation stack and click ‘Delete’ on the top right.
Removing IAM Roles
- Navigate to the IAM console.
- Select Roles on the left hand side.
- Search for the roles that were created from your identity pool.
- Select both roles and click Delete role
- A popup will show once you click Delete role. Click on Yes, delete.